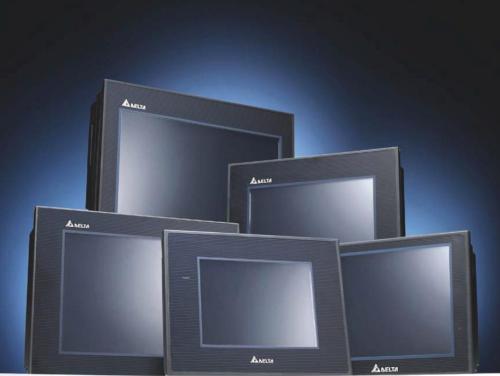
Due recently we have been presenting many new models.
And because or FTP has been not organized since 5 years ago.
We decide to update the FTP to make it more user friendly and adding all the new products, with one-link for software packs and many new product images.
And because or FTP has been not organized since 5 years ago.
We decide to update the FTP to make it more user friendly and adding all the new products, with one-link for software packs and many new product images.
Don´t hesitate to take a look!
→ Leave a comment
New Product Announcement: DVP-SV2 / DVP-EH3
Since the release of the new S2 series, Delta range have been orphan of new High range MPU.
SV and EH2 CPU’s are powerful CPU’s but because of the huge improvement of the SA2 and SX2 CPU’s the comparisons are odious.
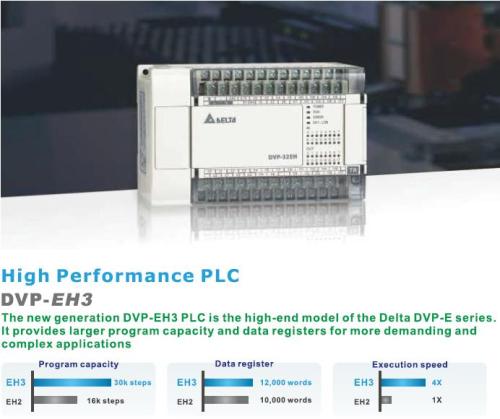
So those new SV2 and EH3 put again the Delta high range CPU were they must be.

SV and EH2 CPU’s are powerful CPU’s but because of the huge improvement of the SA2 and SX2 CPU’s the comparisons are odious.
So those new SV2 and EH3 put again the Delta high range CPU were they must be.

We almost duplicate the program memory and increase the register number to 12000.
We add interruptions; Increase the execution speed in 4-5 times (MOV instruction in 4.8us).
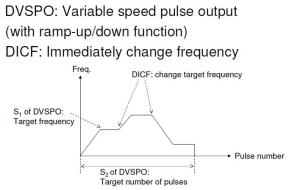
Create new instructions like CSFO, DVSPO, DICF or DZRN who makes easy the control and monitorization of stepper motors in labelling or packaging applications.
We add interruptions; Increase the execution speed in 4-5 times (MOV instruction in 4.8us).
Create new instructions like CSFO, DVSPO, DICF or DZRN who makes easy the control and monitorization of stepper motors in labelling or packaging applications.
If you are interested with the new improvements of EH3 and SV2 CPU’s don’t hesitate to download the following application announcements
HMI – HMI – PLC – PLC Communication Example (Multidrop)
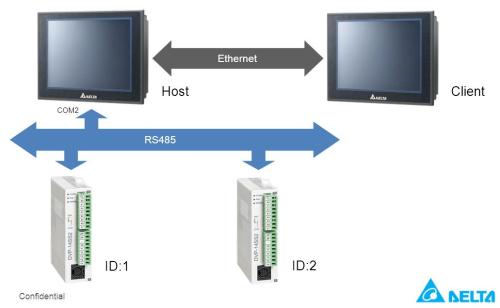
Another useful Ethernet application with our new HMI´s is the multi-dropconnection.
As you can see in the picture configuration, Multi-drop means have 2 mirror HMI´s where can be used and all the actions in one HMI, will be mirrored on the other one.
To do this, we need as always one master and one slave, or with the proper words, one Host and one Client.
To do this, we need as always one master and one slave, or with the proper words, one Host and one Client.
Where our customers use Multidrop? The typical applicaion use to be a huge machine with several control points, printing machine, Parking, etc…
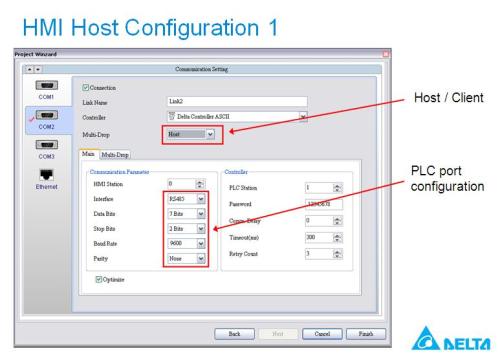
If you are interested follow the tutorial.
You can download the full tutorial and some example on the following link.
HMI-HMI-PLC-PLC Multi-drop configuration
HMI-HMI-PLC-PLC Multi-drop configuration
And as always don´t hesitate to let us know your commentaries
Posted in HMI Tips&Tricks
New product announcement – DVS (Unmanaged Ethernet Switches)
Delta put things in order, and give the total ethernet solution with new launch ofDelta Industrial Unmanaged Ethernet switches.
With the rise of industrial automation technology, Ethernet has become the most popular and widely used communication protocol.
Based on Delta’s accumulated Ethernet communication experience and industrial know-how, the Delta Industrial Ethernet Solution helps customers build up an industrial Ethernet network that will satisfy their requirements in a wide range of applications.
All of Delta’s Ethernet products are certified to UL, CE and FCC standards.
Announcement: ISPSoft 2.00 and COMMGR 1.0 Tutorial
New PLC software generation is coming!
Delta is preparing the tools for the future coming middle size PLC AH500.
The first step must be of course a powerful software tool able to manage the requirements of the industry.
Delta is preparing the tools for the future coming middle size PLC AH500.
The first step must be of course a powerful software tool able to manage the requirements of the industry.
This new version of ISPSoft v2.00 is ready to manage the 5 different languages demanded to be able to accomplish the IEC61131 standard.
But unfortunately only AH500 MPU will have enough power to support them.
The other Delta CPU´s are going to be able to work with ISPSoft 2.0 but not with ST (Structured Text)
But unfortunately only AH500 MPU will have enough power to support them.
The other Delta CPU´s are going to be able to work with ISPSoft 2.0 but not with ST (Structured Text)
This new software have several new tools like HWConfig and NWConfig, and we will go in deep with those tools on further posts.
What we´re interested to show in the first steps of this new ISPSoft.
Is the communication port manager designed to simplify the programming tasks, this tool is called COMMGR.
And it will detect the different communication gateways of your computer giving you the possibility to enable/disable each one when needed.
Is the communication port manager designed to simplify the programming tasks, this tool is called COMMGR.
And it will detect the different communication gateways of your computer giving you the possibility to enable/disable each one when needed.
Take a look on the following tutorials to clearly understand the working way
COMMGR Tutorial 1 (Enable Serial port)
Full screen recommendedCOMMGR Tutorial 1 (Enable Serial port)
COMMGRTutorial 2 (Enable Ethernet port)
Full screen recommended
COMMGR Tutorial 3 (Enable Off-line Simulation)
Full screen recommended
The new ISPSoft is fully compatible with all the new and old Delta PLC series, and the programs are easily convertible from older versions.
Don´t hesitate to download on the following Links
As always, don´t hesitate to let us know your opinion!
CANOpen Communication: DVPCOPM-SL with VFD-EC
Why Can Open?
Modbus is strong an with a long and successful story of applications, but when interpolation is needed, you should need something else..
Is strong, easy to use, and more important fully compatible with many different brand devices on the market.
Is strong, easy to use, and more important fully compatible with many different brand devices on the market.
Because of that we want to start a new Can Open Category with simple applications, easy to work on.
In the near future we will keep adding Can Open examples with all our new compatible Can Open devices (ASDA-A2, C2000, etc…) but for start our cost effective CANOpen drive VFD-EC will work.
Let´s start with the Hardware.
In the near future we will keep adding Can Open examples with all our new compatible Can Open devices (ASDA-A2, C2000, etc…) but for start our cost effective CANOpen drive VFD-EC will work.
Let´s start with the Hardware.
Hardware Configuration:
1. DVP-SX2 + DVPCOPM-SL (CANOpen Master)
2. VFD-EC (CANOpen Embedded Slave)
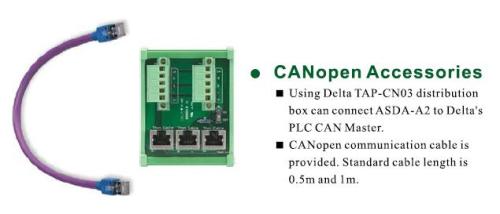
3. TAP-CN03 (CANOpen Splitter with terminal resistor)
4. TAP-CB03 (CANOpen Cable)
2. VFD-EC (CANOpen Embedded Slave)
3. TAP-CN03 (CANOpen Splitter with terminal resistor)
4. TAP-CB03 (CANOpen Cable)
Be aware on the following advices:
- Use CANOpen wirings, Ethernet cables have the same pin-out, and they will work on short distances, but it can give you problems due they don´t have same internal impedance.
- Remember to turn on the terminal resistor switch of TAP-CN03! If you don´t want to use it, remember to put 120 Ohm terminal resistor.
- No need to supply V+ and V- connections for short distances, for long ones is recommended.
VFD-EC Configuration:
P0.02 -> 9 Reset fatory default values
P2.00 -> 5 CANopen of First master frequency command
P2.01 -> 5 CANOpen of forst operation command
P4.08 -> 23 multi-function input terminal (MI6) as Emergency STOP (link MI6 and DCM to work)
P9.20 -> 2 CANopen Station Address
P9.21 -> 0 CANOpen Baudrate 1Mbps
P9.24 -> 1 Adapt DS402 protocol
P2.01 -> 5 CANOpen of forst operation command
P4.08 -> 23 multi-function input terminal (MI6) as Emergency STOP (link MI6 and DCM to work)
P9.20 -> 2 CANopen Station Address
P9.21 -> 0 CANOpen Baudrate 1Mbps
P9.24 -> 1 Adapt DS402 protocol
CANOpen Builder Configuration:
As you can see in the video, once you link on the EDS files the inverter parameters with the PLC registers, you just have to work with them as local registers in the PLC.
The PDO frames are going to be sended automatically in a continuous matter, so every change will be automatically updated in the other device.
The PDO frames are going to be sended automatically in a continuous matter, so every change will be automatically updated in the other device.
HMI and PLC Program:
And after that, you only need to download the PLC and HMI programs.
You will find it in the following link.
The HMI and PLC are connected trough RS232 (DVPACAB2030), but you can change it with no problem.
And after that, you only need to download the PLC and HMI programs.
You will find it in the following link.
The HMI and PLC are connected trough RS232 (DVPACAB2030), but you can change it with no problem.
If it´s your first step with CANopen, test it in your lab, and let us know your experience.
Enjoy!
Enjoy!
Posted in CANOpen
Announcement: New DOPSoft Manual
Few days ago we release the new Application and Operation PLC Manual.
This time is turn for HMI.
This time is turn for HMI.
New HMI Software requires new manual.
In this manual you will find explanations and examples all of them related to new DOPSoft.
In this manual you will find explanations and examples all of them related to new DOPSoft.
You can freely download this huge manual (110Mb) form the Delta Website or our FTP.
Delta Website DOPSoft manual
Delta FTPSite DOPSoft Manual
Delta Website DOPSoft manual
Delta FTPSite DOPSoft Manual
And If you still work with Screen Editor, don´t hesitate to take a look on our brand new DOPSoft
Delta WebSite HMI Software
Delta FTPSite HMI Suite (one only link)
Delta WebSite HMI Software
Delta FTPSite HMI Suite (one only link)
Announcement: New Application and Operation PLC manual
In the next weeks, we´ll release the new SV2, EH3, SE etc…
Some of you would remember the Es2 release 2 years ago. Today we can say that finally the renew of Delta S and E series, has been accomplished.
According to this, we decide to publish new manuals with the features of those new CPU´s.
Some of you would remember the Es2 release 2 years ago. Today we can say that finally the renew of Delta S and E series, has been accomplished.
According to this, we decide to publish new manuals with the features of those new CPU´s.
We highly recommend updating your Delta PLC manuals in the following links
DVP-PLC Application Manual
DVP-ES2_EX2_SS2_SA2_SX2_SE Operation Manual
DVP-PLC Application Manual
DVP-ES2_EX2_SS2_SA2_SX2_SE Operation Manual
By the way, for the new and old readers don´t hesitate to visit our new Page PLC Tips&Tricks with a sum up of all the PLC related posts
HMI – PLC Communication Example (Ethernet)
It´s been a long time since we post the last communication example.
And this time, taking advantage for the new coming soon release of DVS (Unmanagged Ethernet Switches) and new DVP-SE (PLC with Ethernet Embeded), we decide to show everybody how to communicate one PLC and one HMI trought Ethernet.
And this time, taking advantage for the new coming soon release of DVS (Unmanagged Ethernet Switches) and new DVP-SE (PLC with Ethernet Embeded), we decide to show everybody how to communicate one PLC and one HMI trought Ethernet.
To make it easy for everybody, even the ones without English skills.
We thought the best will be to show everybody using video tool.
We thought the best will be to show everybody using video tool.
And If you need the HMI program, don´t hesitate to download it here
By the way, We´re planning to put all communication links in one page to easy link to everybody.
keep visiting our blog
keep visiting our blog
Sequential Programming – PLC tips & tricks
Again we dedicate this post to the beginner PLC programmers.
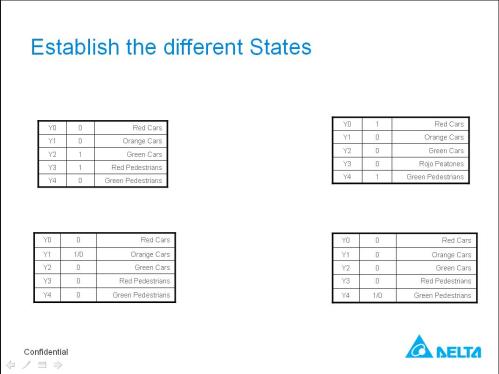
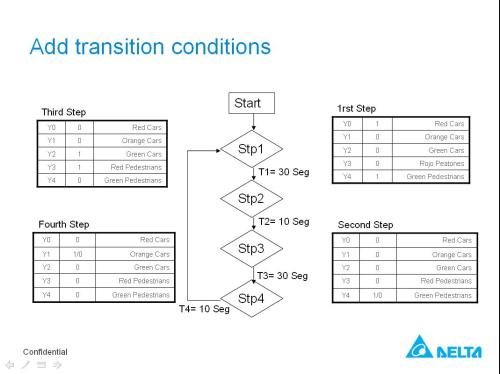
Almost all PLC programs use to follow sequential structure (on state following to another one).
In fact SFC language is based on this concept.
Almost all PLC programs use to follow sequential structure (on state following to another one).
In fact SFC language is based on this concept.
Unfortunately SFC is not always enough user friendly for beginners, and there´s no manuals who show that kind of tricks when you start programming.
So or you have a experienced teacher, or you´re going to expend a lot of time trying to find out the easy way to do it.
So or you have a experienced teacher, or you´re going to expend a lot of time trying to find out the easy way to do it.
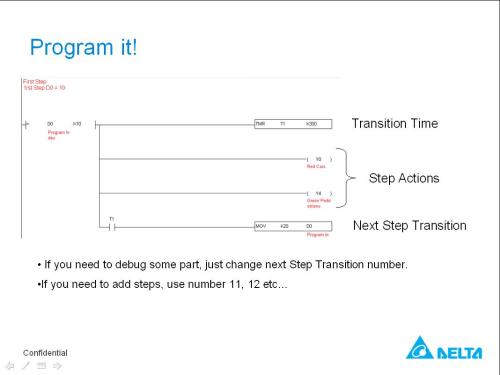
In this case, we want to make the thinks easy, so we made the typical traffic lights program following the Sequential structure.
Once you understand the way of programming, enter to SFC or even Function blocks it will be a piece of cake ;)
Once you understand the way of programming, enter to SFC or even Function blocks it will be a piece of cake ;)
The advantage of this method, are the following:
1. If you programs freeze, you can find the bug easily checking the program index.
2. You can debug each state just changing the MOV value.
3. You can add middle steps easily.
4. you can reboot our program only changing the program index to 0.
1. If you programs freeze, you can find the bug easily checking the program index.
2. You can debug each state just changing the MOV value.
3. You can add middle steps easily.
4. you can reboot our program only changing the program index to 0.
I should recommend to try it by your own, and once you finish, you can download the solution
Programming Sequential Solution ISPsoft & WPLSoft
Programming Sequential Solution ISPsoft & WPLSoft
And let us know if it has been useful!
Posted in PLC Tips&Tricks
PLC Instruction finder
Today I would like to publish a nice job from the technical team in the Delta Hungarian distributor Control Solution.
To show everybody how our partners can improve our documentation in their benefit.
To show everybody how our partners can improve our documentation in their benefit.
Probably some of you spend a lot of time looking for the proper instruction and it´s relative example in the manual to check how to work with it.
Going page to page trying to find whatever you are looking for.
Going page to page trying to find whatever you are looking for.
So to save this hard job to their customers Control Solution people just develop this simple on-line manual easily indexed using html file to find it.
You can link directly from here.
On-line Delta PLC Manual
On-line Delta PLC Manual
I add this link on the blog pages to make the consult faster
Thank you Lajos!
Posted in PLC Tips&Tricks
Successful Application: Pitch Driving on Wind Power Generation
Another successful application, in this case from our global service centre in China.
The application consist in move the inclination of the blades of the big power generation windmills, to get the maximum power from the wind.
And at the same time, when the wind is too strong, protect the windmill situating the blades in less friction position against the win direction.
The application consist in move the inclination of the blades of the big power generation windmills, to get the maximum power from the wind.
And at the same time, when the wind is too strong, protect the windmill situating the blades in less friction position against the win direction.
You can take a look on the complete explanation of the project in the following pdf
The Application of Delta C2000 in Pitch Driving of Wind Power Generation
The Application of Delta C2000 in Pitch Driving of Wind Power Generation
Just remind you that Delta is a huge multinational, and a part from Industrial Automation BU we already have the Wind Energy Business Unit able to provide the full system for anyone interested.
Delta WindEnergy
Delta WindEnergy
Posted in Successful Applications
Successful Application: Oil & Gas pumping application
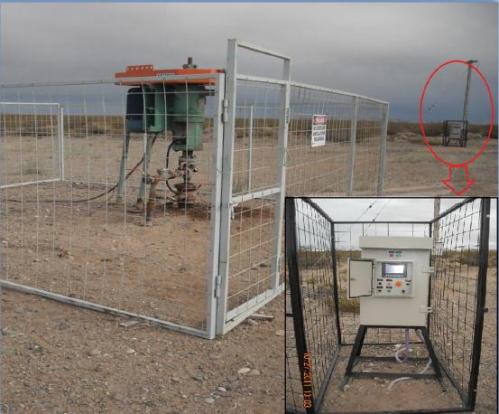
This successful application comes from our colleges in South America (in this case Argentina).
They use Delta tools to help Oil & Gas extraction companies, with pumping units at use in the worst environmental conditions.
They use Delta tools to help Oil & Gas extraction companies, with pumping units at use in the worst environmental conditions.
This application, in the middle of Patagonia desert, demonstrating the reliability and strenght of Delta products.
This application has been done in collaboration between our Team in South America and the Argentinan integrator Equitecnica S.A.
You can download full explanation of the project on the following files
DELTA Success Case – Oil & Gas Application (English)
DELTA Success Case – Oil & Gas Application (Spanish)
DELTA Success Case – Oil & Gas Application (English)
DELTA Success Case – Oil & Gas Application (Spanish)
Felicidades!!
Announcement: WPLSoft v2.30
Be ready programmers, new update for the WPLSoft!
Many new stuff added on that new version, program password protection (on the PC), Float type on the edit register memory, new SE added on the PLC list, and many other thinks that you can check on the announcement below
Technical announement WPLSoft v2.30
Technical announement WPLSoft v2.30
Warning! the DVP format has change! so the previous WPLSoft can not open the programs saved on WPLSoft 2.30.
As always the software is for free, and you can download it on Delta website or our FTP site.
Delta Website Delta PLC Software
FTP Site Delta PLC Software
name: den-eindhoven
Password: BuPd2175
Delta Website Delta PLC Software
FTP Site Delta PLC Software
name: den-eindhoven
Password: BuPd2175
Just for your information, be aware that other Delta software has been update this month. VFDSoftv1.46 and DCISoftv1.08.
And pretty soon ISPSoft will be update too.
And pretty soon ISPSoft will be update too.
Don´t hesitate to let us know your thoughts
Motion Control: Pick & Place (2 axis interpolation)
One of the most typical applications once you have some interpolation device in your hands is Pick & Place.
The objectie of the application is move some object from one point to another one, and you can´t find one single company that didn´t need in some way one variable of this application.
The objectie of the application is move some object from one point to another one, and you can´t find one single company that didn´t need in some way one variable of this application.
Of course application have multiple variables, and the most easy one is with linear movements.
Simple movements Pick & Place
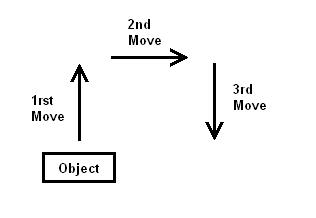
Simple movements Pick & Place

But later engineers think how to save time with that process to make their machines faster.
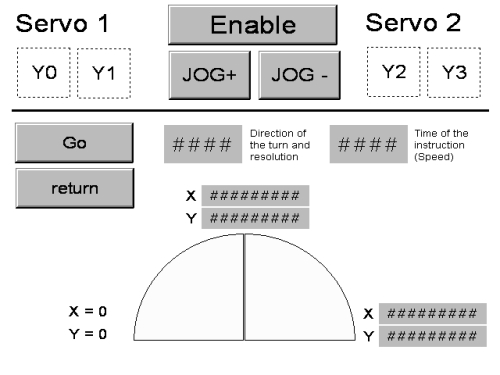
And the easy way is to interpolate both axis following a semicircle as below.
Two axis interpolation
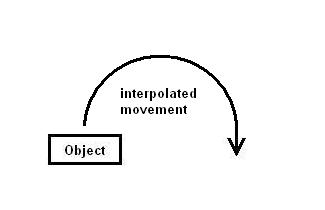
And the easy way is to interpolate both axis following a semicircle as below.
Two axis interpolation

Because of the popularity of Pick & Place, in Delta we have several devices able to work like that. Further more our ASDA-A2 servodrive is able to do it by his own, with no extra PLC or motion controller.
But today I would like to share how to do that application with one of our standard CPU´s and ASDA-B servodrive controlled trough Step & Direction.
So in this case you can use the same program to control Servo systems, Steppers or even inverters.
The CPU´s able to interpolate two axis nowadays in Delta are: DVP-SA2, DVP-SX2 and DVP-SV.
So in this case you can use the same program to control Servo systems, Steppers or even inverters.
The CPU´s able to interpolate two axis nowadays in Delta are: DVP-SA2, DVP-SX2 and DVP-SV.
Regarding the application, you can found how to connect the hardware in the following old post
Motion Control: HMI – PLC – B series Servo (1 axis movements)
Motion Control: HMI – PLC – B series Servo (1 axis movements)
And Regarding the Software, the keypoint is the DCIMA instruction.
check the following program
Pick & Place Example
check the following program
Pick & Place Example
And If you are still not fully convinced to use our PLC´s for Pick & Place.
Here is some video example of our system working!
Is not exactly a pick & place application, but uses the same instruction.
Here is some video example of our system working!
Is not exactly a pick & place application, but uses the same instruction.
And don´t hesitate to Let us know about your experiences with Pick & Place
PLC – Indirect Indexing
Some of the Delta PLC programmers, sometimes wonders what are those E and F index that appears on the WPLSoft wizards.
What can I use them?
So let me told you that secondary letters can save you a lot of time!!!
What can I use them?
So let me told you that secondary letters can save you a lot of time!!!
E and F index are the tool to do indirect calls to variables, n the typical use is to create matrix of elements. It works like the typical pointer, where you can move it along the memory mapping.
Let´s take the below program as example:
Data register (D2000) should be the analog data of an analog input for example, and this value should change on time basis.
Memory_reg register (D7000) is the starting register where I want to save the data loggin.
Memory_reg register (D7000) is the starting register where I want to save the data loggin.
Then I use E register to change the destination register of the adquired data in the following way
MOV D2000 D7000+E0
MOV D2000 D7000+E0
Second 0 -> MOV D2000 D7000
Second 1 -> MOV D2000 D70001
Second 2 -> MOV D2000 D70002
etc…
Second 1 -> MOV D2000 D70001
Second 2 -> MOV D2000 D70002
etc…
For better understanding, don’t hesitate to download the program and simulate it.
E and F registers
E and F registers
Posted in PLC Tips&Tricks
Announcement: DOPSoft 1.00.07 release
Once again, new update of DOPSoft 1.00.07.
DOPSoft will be in near future the only one Delta HMI software so I recommend to everybody to take a look on this new version.
New image and many problems corrected to have finally a very stable product.
New image and many problems corrected to have finally a very stable product.
Check the new changes on the following announcement
Feel free to download the complete version FOR FREE on our website
or on our FTP all at once
HMI Delta Suite May_2012
HMI Delta Suite May_2012
And Enjoy.
Posted in HMI Tips&Tricks
Hannover Mess 2012: HMI seminar
As we promise, for the people who could´t assist to the Munich Hall on Delta Hannover mess Seminar 2012.
Here attached the different new products presentations.
Here attached the different new products presentations.
Different presentations in the order of appearance:
1. Press Conference Energy saving in IA
2. AMD Seminar – Hannover Messe 2012
3. ASD Seminar – Hannover Messe 2012
4. 10MC Seminar – Hannover Messe 2012
5. AH500 Seminar – Hannover Messe 2012
6. HMI Seminar- Hannover Messe 2012
7. ICD Seminar – Hannover Messe 2012
2. AMD Seminar – Hannover Messe 2012
3. ASD Seminar – Hannover Messe 2012
4. 10MC Seminar – Hannover Messe 2012
5. AH500 Seminar – Hannover Messe 2012
6. HMI Seminar- Hannover Messe 2012
7. ICD Seminar – Hannover Messe 2012
name: den-eindhoven
Password: BuPd2175
Password: BuPd2175
And for the ones who couldn´t assist, we invite you on the next SPS/IPC/Drive Messe in Nürnberg from 27-29 of November 2012.
New product Announcement – DVPPF02-SL
Do you need cost effective Profibus distributed I/O??
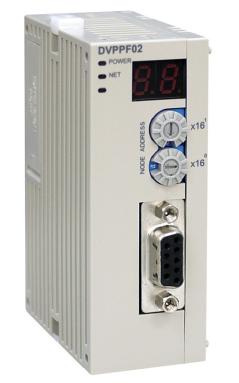
DVPPF02-SL is the new PROFIBUS DP slave communication module.
Only avaliable for left side high speed module, it supports the loop data transmission between PROFIBUS DP master and several slaves.
Only avaliable for left side high speed module, it supports the loop data transmission between PROFIBUS DP master and several slaves.
The DVPPF02-SL have auto-detection baud rate feature, and a maximum data transmission length of 100 words, input and 100 words output.
To take a look on the product specifications, don´t hesitate to download the product announcement
DVPPF02-SL Announcement
DVPPF02-SL Announcement
ATTENTION:
Before using DVPPF02-SL, download the GSD file and load in to the PROFIBUS DP main station.
Before using DVPPF02-SL, download the GSD file and load in to the PROFIBUS DP main station.
In a few days it will be available on the web site, but meanwhile you can download it here.
Web Link to Delta GSD files
Web Link to Delta GSD files
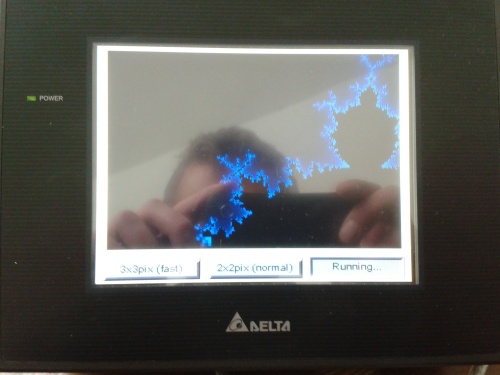
Mandelbrot Rosetta – HMI program example
Normally the information of this Blog comes from two sources, the first is the Global service center of Delta who provides many tutorials and information. The other is the solutions to typical problems of customers compiled by us.
But for the second time one friend of Delta Automation’s blog, send us a really impressive program.
Mr. Johannes Thelen from THELEN TECH (Finland) , looking for squeeze the macro and floating point features, creates this Mandelbrot Rosetta software with our DopSoft.
The 1 pixel accuracy program needs around 15 minutes to be writen, that´s why they send me the next picture as a demostration
The most curious can download the program an take a look on the macro, it´s really a clever job.
Don´t hesitate to send your interesting programs and applications to us, and We’ll be glad to share with everybody.
Thank you so much Johaness!
Delta will be at Hannover Messe 2012

Delta Electronics invites you to join the world’s largest industrial fair –Hannover Messe 2012 from Apr. 23 – 27. Visit us at booth no. 49, Hall 11, for the latest applications in industrial automation and power system. In addition to system demonstration at booth, Delta Industrial Automation Business Unit (IABU) will hold new product introduction seminar in the afternoon of 24th April as below information.
Date : Afternoon of 24, April
Time: 15:15 – 18:15
Place : Room Dresden at Conference Centre
Time: 15:15 – 18:15
Place : Room Dresden at Conference Centre
Agenda:
15:15 – 15:25 Opening Speech by Delta CEO Yancey Hai
15:25 – 16:05 AMD – IED/REG2000/CP2000
16:05 – 16:45 Motion Solution – ASD-M/DVP10MC/DMCNET
16:45 – 17:15 Factory Automation – PLC-AH500
17:15 – 17:45 HMI – DOPsoft/e-Server/e-Remote
17:45 – 18:15 DMV/DT3/PSU
15:15 – 15:25 Opening Speech by Delta CEO Yancey Hai
15:25 – 16:05 AMD – IED/REG2000/CP2000
16:05 – 16:45 Motion Solution – ASD-M/DVP10MC/DMCNET
16:45 – 17:15 Factory Automation – PLC-AH500
17:15 – 17:45 HMI – DOPsoft/e-Server/e-Remote
17:45 – 18:15 DMV/DT3/PSU
Of course all the blog team will be there responding your questions!
Hope to see you in Hannover.
Hope to see you in Hannover.
PC – PLC Communication (PLC control without SCADA)
Is not very common, but sometimes is needed to communicate our PLC´s directly to PC.
The typical applications use to be testing machines, who needs accurate response time, or complex machines who use the PLC to easy control over simple parts of the machine.
And some times (why not) because our PLC’s are cheaper than a digital/analog I/O PCI Cards!
The typical applications use to be testing machines, who needs accurate response time, or complex machines who use the PLC to easy control over simple parts of the machine.
And some times (why not) because our PLC’s are cheaper than a digital/analog I/O PCI Cards!
Because of that we create some libraries and examples in the most updated PC programming software to help you on this.
On the following compilation, you will find Examples in Visual Basic, VBNet, andCSharp.
PC-PLC communication Library
Delta DLL library
Delta Comunication Protocol definition
PC-PLC communication Library
Delta DLL library
Delta Comunication Protocol definition
Feel free to download and use them for your applications.
New Product Announcement – DVP16SN11T
Expanding the DI-DO family products.
That new Slim series expansion module have 16 digital outputs in one only module.
No special wirings or connection panels are needed.
So it´s a good choice for systems with many outputs.
No special wirings or connection panels are needed.
So it´s a good choice for systems with many outputs.
Release announcement – DVP16SN11T
Model available only for NPN output.
Model available only for NPN output.
DOPSoft – Insert new picture
The people who already work with Delta for a long time, already knows how to do that.
But If you just started with us, that little help can save you a lot of time.
But If you just started with us, that little help can save you a lot of time.
The video attached shows you how to insert your pictures in your HMI program.
The typical use should be for example a photo of your machine. And once you added, you can put all the warnings and alarms on the same machine picture like a SCADA synoptic.
The typical use should be for example a photo of your machine. And once you added, you can put all the warnings and alarms on the same machine picture like a SCADA synoptic.
Full screen recommended
But remember! more pictures you add bigger you program is, so be careful with the size of your pictures.
ISPSoft – DOPSoft Tag list
Handle variables between PLC program an HMI program, sometimes should be really complicate.
Everytime I made new program, I make my own excel file with all the variables to do not forget where are located, or what´s it´s name.
Everytime I made new program, I make my own excel file with all the variables to do not forget where are located, or what´s it´s name.
So once we start to develop the new Delta software for HMI and PLC, we thought it would be a good idea to have a simple method to share variables. And of course using a Excel file, why not!
Let´s check this video.
Full screen recommended
As you can see with the new ISPSoft for PLC´s, and DOPSoft for HMI´s.
Is really easy to export/import variables making the programing experience faster and user friendly.
Is really easy to export/import variables making the programing experience faster and user friendly.
Don´t hesitate to share your experiences with us.
ISPSoft – SFC example
As many of you should know ISPSoft is Delta´s more powerful PLC programming language.
Trying to show you all their possibilities, today we will show you how to work with SFC programming language.
Trying to show you all their possibilities, today we will show you how to work with SFC programming language.
To do that, we present the following video.
Full screen is recommended
And of course the related example (with the video attached!).
SFC Example (ISPSoft)
SFC Example (ISPSoft)
And If you are new in Delta don´t hesitate to download ISPSoft.
Posted in PLC Tips&Tricks
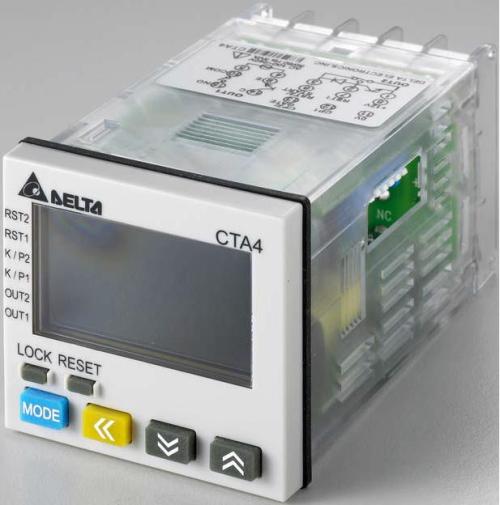
Announcement: CTA-D (24Vdc Counter/Tachometer/Timer)
Delta R&D team has launched the new cost-effective and user-friendly industrial automation product, the 3-in-1 timer/counter/tachometer. But this time with 24Vdc power supply.
You can check all the features of this device in the following announcement
CTA New Product Launch Announcement
CTA New Product Launch Announcement
Furthermore, If you want more information regarding this device, don´t hesitate to take a look on the CTA website
IFD9506 (part 3 of 3)
We arrive to the end of the IFD9506 monographic with the definitive application (and some final desert).
In this case we use the IFD9506 to add any Delta product to a Ethernet network.
In fact with the new firmware V1.07 is possible to add until 100 devices below the Ethernet gateway!!
In this case we use the IFD9506 to add any Delta product to a Ethernet network.
In fact with the new firmware V1.07 is possible to add until 100 devices below the Ethernet gateway!!
And as a final climax, one last example of how to use IFD9506 as a gateway between one Ethernet HMI and some RS485 Delta periphericals (EX2, SV and DTB).
Have fun!
And put ethernet in our life ;)
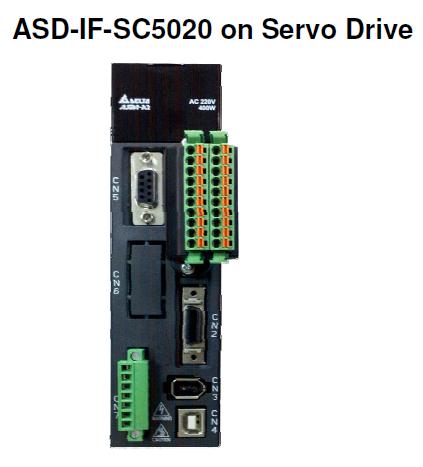
Announcement: New connector ASD-IF-SC5020 for A2 servodrives series
Tired of soldering connectors?
How irritating it is to sold the DI/DO on A2 servodrive, just for testing, isn´t it?
So, take a look to that connector!
So, take a look to that connector!
What do you think?
Check the details on the following new product announcement.
And ask for it to your local distributor!
And ask for it to your local distributor!
Posted in Announcements
Announcement: New DOPB04S211 launch
Some of you already hear about this new HMI.
And finally, as a Christmas present, and to celebrate the 2012, Delta proudly offers new DOP-B small size HMI DOP-B04S211
And finally, as a Christmas present, and to celebrate the 2012, Delta proudly offers new DOP-B small size HMI DOP-B04S211
Our objective on the moment of desing this new HMI was Looking for the maximum performance with less price, according to that we take out the USB Disk and one COM port to achieve the best quality price relationship.
The HMI It adopts 4.7” 65536 colors TFT LCD, and greatly enhances resolution to WQVGA(480×271), to beat their monochrome direct competitors.
The HMI It adopts 4.7” 65536 colors TFT LCD, and greatly enhances resolution to WQVGA(480×271), to beat their monochrome direct competitors.
Refer to the following pdf for basic information of that new HMI
New product Launch Announcement DOP-B04S211
New product Launch Announcement DOP-B04S211
On the other hand, If you prefer more deep technical specifications, don’t hesitate to download the DOPB04 technical sheet.
Conclusion:
Size does matter ;D
Size does matter ;D
ASDA-A2 and ASDA-B2 motor tuning procedure
As many of you should know, to tune a servo motor is not a piece of cake.
To have a good tune, you have to take care of the load, the inertia, the gearbox, etc..
To have a good tune, you have to take care of the load, the inertia, the gearbox, etc..
To help you in this task, Delta provide different kind of tools.
1. ASDA-Sizing
This software is really useful to calculate the interta and the Torque needed of your system.
With this tool you can calculate the power of the motor needed and avoid bad experiences in customer’s hose
This software is really useful to calculate the interta and the Torque needed of your system.
With this tool you can calculate the power of the motor needed and avoid bad experiences in customer’s hose
You can dowload it for free (as usual) on Delta’s web page.
But If you already installed ASDA Soft, check your computer, because probably it would be there.
ASDA-MSizing v1.04
But If you already installed ASDA Soft, check your computer, because probably it would be there.
ASDA-MSizing v1.04
2. Autotuning
Depending of the drive the ASDA-Soft have different autotuning tools.
On the video, we adjust (without load) some ASDA-B servodrive
Depending of the drive the ASDA-Soft have different autotuning tools.
On the video, we adjust (without load) some ASDA-B servodrive
On the other side, for the ASDA-A2 servodrives, our Service team, did the following PDF to help you in that task.
Simple TUning ASDA-A2&B2
Simple TUning ASDA-A2&B2
Good tuning for everybody!
Posted in Motion
Export History to USB – HMI Example
If you need to save the history data of your machine, you have two ways to do it:
1. Save it on the internal HMI memory.
2. Save it on external USB Disk.
1. Save it on the internal HMI memory.
2. Save it on external USB Disk.
The problem of the first option was that you are not able to extract the data, and the problem of the second option was that you need to have the USB disk connected meanwhile the HMI is acquiring data.
Well, this limitation, is not a limitation any more with the new macro tool Export. THis command allows to export the history data stored in the HMI to a USB disk or SD card.
And it’s really simple to use it.
And it’s really simple to use it.
Please serve yourselves on the following example provided by the R&D team
export history to USB example
export history to USB example
Posted in HMI Tips&Tricks
Announcement: DOPSoft 1.00.02 Release
New version for DOPSoft, with many and really interesting new features listed in the following pdf
Technical Announcement DOPSoft 1.00.02 Build DEC_13_2011
Technical Announcement DOPSoft 1.00.02 Build DEC_13_2011
Your opinions are always welcome!!
Announcement: DVPCOPM-SL CANOpen Comunication manual
To all the CANOpen users!
Be aware that a new manual for the DVPCOPM-SL manual has been released.
Be aware that a new manual for the DVPCOPM-SL manual has been released.
But this is not all, because the release of the new manual comes hand in hand with the release of the CANOpen Builder 2.02 software.
Please download it here CANOpen Builder 2.02
And If you want to know what’s new on this release, then check the following announcement CANOpen Bulder 2.02 announcement
IFD9506 (part 2 of 3)
In the second part of this IFD9506 mono graphic, we’ll show you how to combine our IFD9506 with the other successful Ethernet module: DVPEN01-SL.
To make the thinks easy, this time we will communicate two of our DVP28SV with one of our DOPA HMI trough the RS485 port, using the IFD9506 as a gateway between the RS485 port and the ethernet PLC module (DVPEN01-SL).
Aplication presentation: IFD9506+2 DVPEN01-SL
Nowadays, this application doesn’t have a lot of sense, because with the new Ethernet HMI this is not necessary anymore.
But this example opens the door for the next (an last) post of this monographic, where we will communicate from some SCADA or external client to our system trough IFD9506.
Furthermore, the fieldbus team keep us a nice surprise on the latest firmware update of IFD9506!
Can you wait?
Posted in PLC Tips&Tricks
Announcement: WPLSoft 2.20.11
As the Delta PLC programmers should know, in this moments every Delta PLC is able to be programmed with two software.
WPLSoft: Simple, intuitive and fast software for simple ladder applications.
ISPSoft: Updated ladder software with subprogram organization and variable name, specifically designed to be closer to IEC61131 for complex PLC programming.
ISPSoft: Updated ladder software with subprogram organization and variable name, specifically designed to be closer to IEC61131 for complex PLC programming.
Today we will announce the release of a new version for WPLSoft v2.20.11, with a few new updates from the old version.
You could check all this updates on the following Technical Announcement
You could check all this updates on the following Technical Announcement
As always Delta Software is available for free and you could download it on delta web site, and on DEN ftp too.
IFD9506 (part 1 of 3)
Let’s play with Ethernet!
Industrial Ethernet has become the last 10 years as the replacement for the serial communication. Not only because the speed, but for the simple compatibility with our main tools, the computers…
Each automation brand have their own protocol based on Ethernet (Profinet, Ethernet/IP, Ethernet Powerlink, etc…).
In Delta, we have been playing with Modbus from the beginning, so in the moment that we decide to enter to ethernet, the natural choice was Modbus TCP/IP.
In Delta, we have been playing with Modbus from the beginning, so in the moment that we decide to enter to ethernet, the natural choice was Modbus TCP/IP.
But what happen with all the devices already in the factories working with Modbus RS232 or RS485 ?
To solve this need, we develop IFD9506.
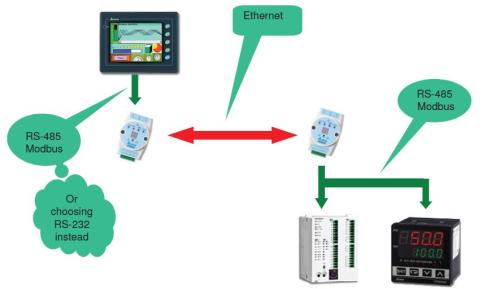
This device is used to convert from Ethernet Modbus TCP/IP to serial communication Modbus.
And the following weeks we’ll share with you all several typical applications and functionalities of this device.
This device is used to convert from Ethernet Modbus TCP/IP to serial communication Modbus.
And the following weeks we’ll share with you all several typical applications and functionalities of this device.
To start, we are going to use the simple communication HMI-PLC-DTB and we’re going to add two IFD9506 to achieve to communicate both three devices trough Ethernet as the picture shows.
To achieved, use the attached application tutorial.
HMI + IFD9506 + PLC.pdf
And take a look at the last page and our first approach to web server!
HMI + IFD9506 + PLC.pdf
And take a look at the last page and our first approach to web server!
Posted in FieldBus Solutions Tips&Tricks
How to control Delta AC drive using Step & Direction
There are three basic ways to control a AC drive:
- Torque control (analog signal, digital signal, embedded potentiometer, communication)
- Speed Control (analog signal, digital signal, embedded potentiometer, communication)
- Position Control (Step&Direction, Comunication)
- Torque control (analog signal, digital signal, embedded potentiometer, communication)
- Speed Control (analog signal, digital signal, embedded potentiometer, communication)
- Position Control (Step&Direction, Comunication)
But because the inverters accuracy (usually) is not very good, the engineers, prefer to use Steppers, or Servosystems.
So the majority of the inverter applications used to be Speed or Torque control.
So the majority of the inverter applications used to be Speed or Torque control.
But the last years, in the industry appears the need to realize good positioning with middle power and reliable cost. Servo drives are still too expensive for middle power and steppers are only for low power applications.
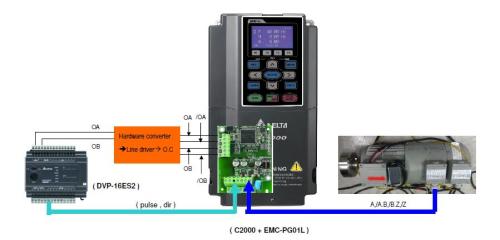
Because of that, the new C2000 surprise us again, with the capability to have accurate positioning using Step & Direction control.
The way to achieve the good accuracy, is because some feedback encoder located on the motor and the EMC-PG01L card, to acquire the feedback and position command at the same time.
The way to achieve the good accuracy, is because some feedback encoder located on the motor and the EMC-PG01L card, to acquire the feedback and position command at the same time.
If you wolud like to set up this system in your factory, or for your customers, check the following tutorial presentation from Mr. Robert Lo.
name: den-eindhoven
Password: BuPd2175
Password: BuPd2175
Posted in PLC Tips&Tricks
EDS Builder
Everytime you need to insert your devices inside some Devicenet or CanOpen network, the master would need some driver.
Those drivers are called EDS files.
That EDS file is different for every drive, and it may be configured depending of the data that we want to send to the master.
Those drivers are called EDS files.
That EDS file is different for every drive, and it may be configured depending of the data that we want to send to the master.
Delta have many Inverter and Servodrives models able to communicate trough CANOpen or Devicenet, because of that I would like to introduce you to a software tool to create that specific EDS files for each drive and application.
EDSBuilder V1.01, just released a month ago, we’ll be able to create the EDS file compatible with any brand CANOpen or Devicenet network.
Of course, Delta already have CANOpen master to controll them, but this is another history.
Of course, Delta already have CANOpen master to controll them, but this is another history.
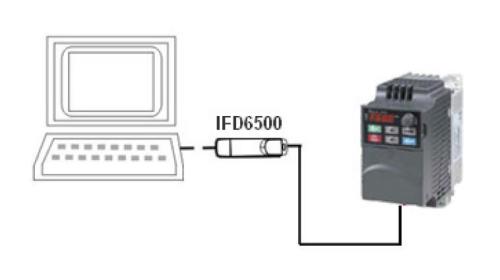
To use this software, we will need the device to communicate, and some IFD6500 (USB-RS485 converter) to communicate with the device.
And once you have it, just follow the instruction of the following tutorial “How to create EDS via EDSBuilder”
name: den-eindhoven
Password: BuPd2175
Password: BuPd2175
Enjoy!
Announcement: Phase out DOP-B07Sxx
Due the new DOP-B07S415 / DOP-B07E415 HMI model, we decide to phase out the DOP-B07S200 / DOP-B07S201 / DOP-B07S211 models.
The pannel cutout of this new HMI is exactly the same of the older ones.
And of course inside those new HMI you can found many improvements.
And of course inside those new HMI you can found many improvements.
The most sharp, probably may see another important difference.
In this new Delta HMI we decide to discard auxiliary Buttons.
In fact this is a company policy decision, because none of the future Delta HMI will have buttons any more.
In this new Delta HMI we decide to discard auxiliary Buttons.
In fact this is a company policy decision, because none of the future Delta HMI will have buttons any more.
Finally, I would like to share with you what is the new Delta HMI scene, compiling all the phasing out and new product launch on the next table
HMI Getting Started
Here it is!
Again thinking in the begginers (and in this case not only them), let me share with you all our kit HMI Getting Started.
For the ones who uses PLC Getting started, and for the other too
Again thinking in the begginers (and in this case not only them), let me share with you all our kit HMI Getting Started.
For the ones who uses PLC Getting started, and for the other too
HMI used to be more intuitive and user friendly than the PLC, but If you are trying to accomplish a complete program with reciepe, graph pictures etc.. you need some knowledge.
So our intention is give you some tutorials and examples and all the necessary tools to made your learning time as short as possible.
So our intention is give you some tutorials and examples and all the necessary tools to made your learning time as short as possible.
In this HMI getting started you will find:
1. eRemote / eServer Tutorials
2. HMI communication Examples with Delta devices
3. Manuals for DOPA and DOPB
4. Program examples for many features (graph, password, History, Event, Alarm, etc…)
1. eRemote / eServer Tutorials
2. HMI communication Examples with Delta devices
3. Manuals for DOPA and DOPB
4. Program examples for many features (graph, password, History, Event, Alarm, etc…)
Don’t hesitate to share with everybody.
Posted in HMI Tips&Tricks
Announcement: New products DVP02LC-SL and DVPSCM12-SL
The new S series models upgrade, give us the capability to start to use high speed left bus more often.
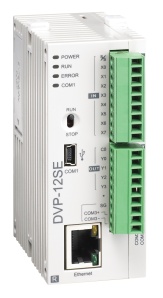
In the past we only have DVP-28SV, but now we could connect our high speed modules in two new CPU’s DVP-12SA2 and DVP-20SX2.
Because of that, our Delta engineers develop new high speed modules to make our life easy.
The first one is DVP02LC-SL.
In the past we only have DVP-28SV, but now we could connect our high speed modules in two new CPU’s DVP-12SA2 and DVP-20SX2.
Because of that, our Delta engineers develop new high speed modules to make our life easy.
The first one is DVP02LC-SL.
DVP02LC-SL
DVP02LC-SL is device designed for two functions: Tension control applications and Weight applications.
It provides 24-bit resolution applicable for 4-wire or 6-wire load cells with various eigenvalues.
DVP02LC-SL is device designed for two functions: Tension control applications and Weight applications.
It provides 24-bit resolution applicable for 4-wire or 6-wire load cells with various eigenvalues.
Below you can download the official product announcement with the features of the device. Furthermore, we add some real field application to understand the functionality of this device.
DVP02LC-SL Product Announcement
DVP02LC-SL tension control application
DVP02LC-SL Software (LCSoft_V1.00)
DVP02LC-SL Manual
DVP02LC-SL tension control application
DVP02LC-SL Software (LCSoft_V1.00)
DVP02LC-SL Manual
This device is already available
DVP12SCM-SL
The other important launch in relation with High speed left side modules, is this 2 multi-use Serial communication ports.
Basically are 2 serial expansion RS485/RS422 ports with the capability to change the frame construction. This allows us to communicate with every kind of device with serial communication.
The principal assets are:
1. Can be used as extra port to monitor and program the MPU.
2. Can add to the PLC up to 16 ports, these means that our 32 node limitation of RS485 can reach now up to 512 devices.
3. Strongly noise immunization with 120 ohm terminal resistor embedded.
4. User-defined communication (UD Link) provides flexible communication protocol interface. It’s made
DVPSCM12-SL can connect to all kinds of serial communication device.
This device will be available 2011 Q4
PLC Link (PLC to VFD)
PLC-Link is not only a tool to exchange data between PLC’s.
With PLC-link you can also share memory space with a servo, inverter, temperature controller, etc…
In this case I would show you the procedure to do it with VFD-E series drive.
With PLC-link you can also share memory space with a servo, inverter, temperature controller, etc…
In this case I would show you the procedure to do it with VFD-E series drive.
The advantage of this method agains the “sending frames one” is that you don’t need to program and trigger one frame for every value read or write to the slave.
With this method, you only have to configurate the communication, and you will have any Slave value in your master buffers.
follow the next steps:
With this method, you only have to configurate the communication, and you will have any Slave value in your master buffers.
follow the next steps:
1. Hardware
use exactly the same advices as the PLC-VFD communication post.
use exactly the same advices as the PLC-VFD communication post.
2. Decide the protocol to be used.
And write it on a post it in front of you. In this case we use protocol Modbus ASCII, 9600 baud,7,Even,1
And write it on a post it in front of you. In this case we use protocol Modbus ASCII, 9600 baud,7,Even,1
3. Inverter configuration (almost same as PLC-VFD communcation post)
The important think on this step is get ready the inverter to receive orders from RS485 interface, so depending the inverter the values are going to be different. In this example I use VFD-E.
Check the parameters If you are going to use another inverter.
The important think on this step is get ready the inverter to receive orders from RS485 interface, so depending the inverter the values are going to be different. In this example I use VFD-E.
Check the parameters If you are going to use another inverter.
2.00 = 3
Source of First Master Frequency Command
3: RS-485 (RJ-45) communication
Source of First Master Frequency Command
3: RS-485 (RJ-45) communication
2.01 = 3
Source of First Operation Command
3: RS-485 (RJ-45) communication. Keypad STOP/RESET enabled.
Source of First Operation Command
3: RS-485 (RJ-45) communication. Keypad STOP/RESET enabled.
9.00 = 2
Communication Address
in my example 2
Communication Address
in my example 2
9.01 = 1
Transmission Speed
3: Baud rate 9600bps
Transmission Speed
3: Baud rate 9600bps
9.04 = 1
Communication Protocol
0: 7,E,1 (Modbus, ASCII)
Communication Protocol
0: 7,E,1 (Modbus, ASCII)
4. PLC Software
In this case I recommend to have the manual opened, because basically is a matter to configure the PLC-Link special registers properly.
In this case I recommend to have the manual opened, because basically is a matter to configure the PLC-Link special registers properly.
D1399:ID address of the first slave
D1434:Number of consecutive registers to be Read (by the master)
D1355:First register direction of the slave to be Read (H2102 = Frequency command)
D1450: Number of consecutive registers to be Write (by the master)
D1415: First register direction of the slave to be Write (H2001 = Frequency command)
D1480:Readed values Master Buffer (Slave 1)
D1496:Writed values Master Buffer (Slave 1)
To find what register I need to edit in each case, look in the manual for any of those registers, and look for the proper one.
And Check the following program and test it.
PLC Link COM2 (PLC – VFD)
PLC Link COM2 (PLC – VFD)
I’m pretty sure that system will save you a lot of time and efforts.
Posted in PLC Tips&Tricks
Announcement: ASDA-A2 three-phase 400Vac
I know… The announcement comes a little late, because probably some of you already have some of those devices in your Labs and/or Office.
But before wait for this device for such a looong time, we’re glad to announce it, even If it’s late!
You can download the official announcement in the link below, but basically those are the features of that 400 Vac A2 drives:
1. Broad power range available from 750W to 7.5kW.
2. Input power supply of all ASDA-A2 400V series servo drives is AC 400V (380V~480V), 3-phase.
3. An incremental 20-bit (1280000 p/rev) optical encoder is equipped.
4. The motor inertia is divided into three types: Low inertia (J), Medium inertia (K) and
Medium-High inertia (L). There are 80mm, 130mm and 180mm three kinds of frame
sizes are available. The motor speed is from 1500 r/min to 5000 r/min and the torque
output is from 2.39 N-m to 119.36 N-m.
5. Built-in flexible position register control mode (PR mode) is offered. 35 kinds of homing
modes and 64 internal memorized position settings are available.
On the other side, If you want to start ordering to your Delta provider, I recommend to take a look to the next Excel Ordering guide, very helpful to don’t make mistakes choosing the proper wiring
PLC Getting Started
The content of this blog, used to be for people already introduced to the Delta PLC world.
So with this post, we would like to give support all those people who wants to introduce themselves to the Delta PLC environment.
Is really not easy If you try to figure out all the capabilities of our devices only with the manuals, that’s why we develop the following “ZIP” file, with the following content:
1. S and S2 series Updated Manuals.
2. S and S2 series Memory Mapping.
3. PLC Special Marks, Registers and Error code.
4. Instruction List for quick reference.
5. WPLSoft video tutorials (on-line, Off-line, set-up communication).
6. Small Library with basic Examples.
2. S and S2 series Memory Mapping.
3. PLC Special Marks, Registers and Error code.
4. Instruction List for quick reference.
5. WPLSoft video tutorials (on-line, Off-line, set-up communication).
6. Small Library with basic Examples.
Don’t hesitate to download and share with your beginner customers, and If you like it, tell us.
And we’ll use this experience to create the HMI getting started.
And we’ll use this experience to create the HMI getting started.
PLC-Link (PLC to PLC)
I have been a long time that I would like to post this post.
PLC-Link is a Delta protocol to share easily memory area between 2 PLC’s.
Basically, the big advantage of PLC-Link is to work with Delta PLC’s as Remote I/O units.
Basically, the big advantage of PLC-Link is to work with Delta PLC’s as Remote I/O units.
Furthermore, you can use Delta PLC as Remote I/O or any other Delta device (Servodrive, Inverter, etc..) because the protocol used to share the info is Modbus.
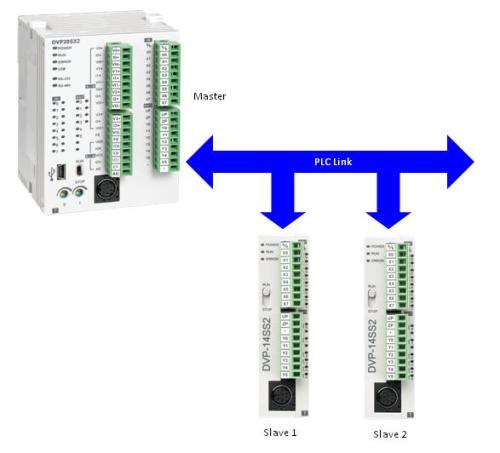
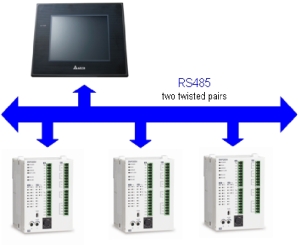
Today we’ll focus on how to communicate one PLC master with 2 PLC slaves.
Today we’ll focus on how to communicate one PLC master with 2 PLC slaves.
Hardware:
The communication will be Modbus RS485, so the wiring is so simple, two twisted pairs from connector to connector.
The communication will be Modbus RS485, so the wiring is so simple, two twisted pairs from connector to connector.
Protocol:
We decide to use 9600, 7, E, 1, ASCII, but you can use higher baudrate. In fact the new S2 PLC series (SS2, SX2, SA2, ES2 and EX2) can reach 921Kbps!!
We decide to use 9600, 7, E, 1, ASCII, but you can use higher baudrate. In fact the new S2 PLC series (SS2, SX2, SA2, ES2 and EX2) can reach 921Kbps!!
Memory Mapping:
The plan is to share 6 registers from the slave 1 and put it inside the memory of the master.
And on the other way around too, put 6 registers of the master on the memory of the Slave one.
The plan is to share 6 registers from the slave 1 and put it inside the memory of the master.
And on the other way around too, put 6 registers of the master on the memory of the Slave one.
See below table
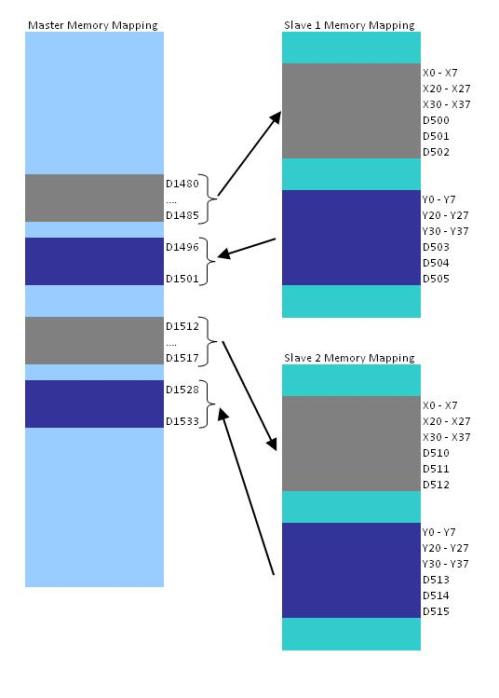
As you could see on the Slave software we transform the first three shared words to Slave Inputs and Outputs.
This is the proper way to read remotely the I/O of the slave into the master.

As you could see on the Slave software we transform the first three shared words to Slave Inputs and Outputs.
This is the proper way to read remotely the I/O of the slave into the master.
Programs:
Remember to enable PLC-link on network 5 to start to share.
And if some trouble occurs just try to reset the communication with the RESET_Com Symbol.
And if some trouble occurs just try to reset the communication with the RESET_Com Symbol.
Enjoy
Announcement: ISPSoft 1.03
Is time for update.
After new eRemote version, this week is the turn of ISPSoft.
After new eRemote version, this week is the turn of ISPSoft.
For the beginners, ISPSoft is the Delta software to program with Functions blocks, the main difference against WPLSoft are: Sub-routine programming. Work with Variable mnemonics in spite of the name of the mark or register. Everything with the advantages of function blocks.
If you are a beginer and you want a briefly introduction to ISPSoft, take a look to the following presentation
On the other side, If you already work with ISPSoft, this is the full list of the ISPSoft 1.03 new additions, I hope you enjoyed.
1. Add SFC Editor.
2. Add ASCII format in device monitoring function.
3. New instruction. FLD> …, BOUT …, PN, NP.
4. Support array data type.
5. Add VAR_IN_OUT type to function block symbol table.
6. Allow to set the S device range in the Device Resource Allocation function.
7. Ladder Editor. Modify short-cut key, Add network (after)=> Shift+Ctrl+I ; Insert network (before)=>Ctrl+I.
8. Ladder Editor. Add comparison buttons on the tool bar.
9. Ladder Editor. Symbol declaration window will be shown when add instructions by instruction mode.
10. Add a symbol without indicate which POU to the device monitoring table. It will list all match symbols exist in different POU.
11. The output parameter of MUL and DIV instruction support WORD data type.
12. Add ASCII and Automatically mode in the [View] -> [Monitoring Data Format]
13. Add Floating Format Setting function in the [View].
14. Add Read Only Area Setting function in the [PLC]->[Security System].
15. Add Program Upload Disable function in the [PLC]->[Security System].
16. Add off-line password setting function in the [Tools]->[Program Settings].
17. Change the communication type from Direct Link to Direct Link Ethernet and Direct Link USB
18. Allow on-line monitoring even the programs between PLC and PC are inconsistent.
19. Add Find in Project function.
20. Add Spanish and Polish language.
Please download the latest version on our website
ISPSoft 1.03
ISPSoft 1.03
or our FTP site
ISPSoft 1.03
ISPSoft 1.03
Announcement: New eRemote 2.00.00
Good news!
New eRemote version available to download.
New eRemote version available to download.
This is the short list of improvements in spite of the old version:
1. Support firmware version v3.0022 for DOP-B network type series.
2. Support firmware version v1.08C for DOP-AE series.
3. Add full screen function.
4. Add connecting HMI IP address on the title of the window function.
5. Add use the domain name to connect the HMI function.
6. Support new elements of DOPSoft but not rotation function.
7. Fixed show the password table wrong issue.
Download it from here.
eRemote 2.00.00
eRemote 2.00.00
And to see in detail those new features, check the attached pdf announcement
Announcement: eRemote 2.00.00
Announcement: eRemote 2.00.00
By the Way, eServer is updated too, Don’t hesitate to take a look!
eServer 1.00.11
eServer 1.00.11
PID Heating and Cooling
To set-up a PID control with Delta PLC’s is not a big deal.
You only need the set Point, the present value, configure it as you need (or use auto-tuning to avoid complications), and put everything on PID instruction (API 88).
You only need the set Point, the present value, configure it as you need (or use auto-tuning to avoid complications), and put everything on PID instruction (API 88).
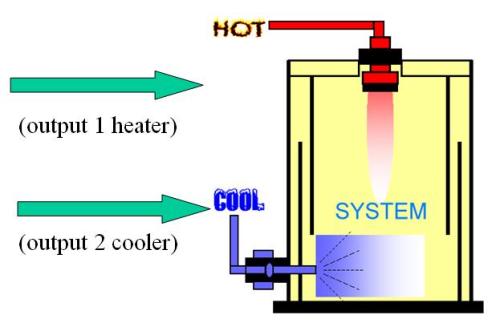
Depending If your device to control the temperature needs pulse output or analog, you can use the value directly for analog, or the instruction GPWM (API 144) to control the heat with Pulse Modulation signal.
But what happen If your system have double output? (heating and cooling)
Of course you can always use our DTB temperature controllers to solve that problem easy and fast, but If you need to do it with one of our PLC’s.
Take a look to the following program.
PID_heating and colling.dvp
Take a look to the following program.
PID_heating and colling.dvp
Posted in PLC Tips&Tricks
High Speed Inputs – Outputs in new Delta PLC S2 series
One of the most used features of our new S2 series are the high speed Inputs and Outputs.
The manual and brochures, have all the information here related, but we like to compile it for fast reference.
The manual and brochures, have all the information here related, but we like to compile it for fast reference.
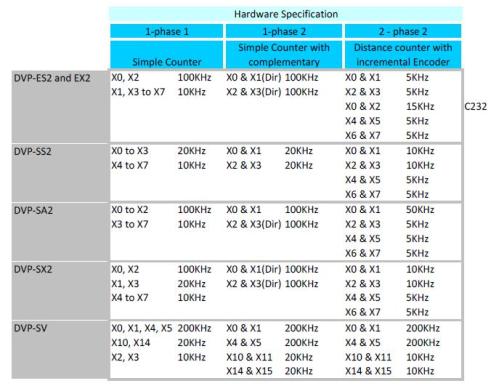
To control a Delta Servo drive trough step and direction (or a stepper motor, inverter…) those are the speed limitations of our new PLC’s
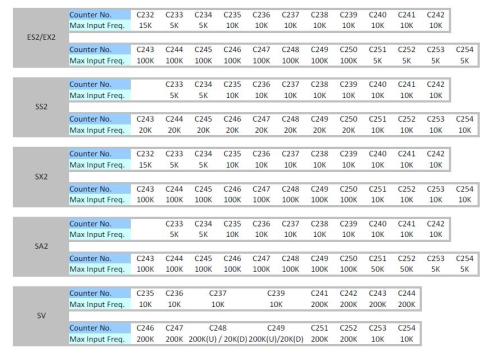
On the other side, If you need to measure a distance with Encoder, or just counting the number of pieces, then you must check first what are the max speed allowed for our CPU’s
But If you are going to made the program, this sheet with the proper Counter name, and their limitations, It would be really useful.
If you prefer to save all this information in your computer download the nextExcel file
Posted in PLC Tips&Tricks
Announcement: eServer 1.00.11 Official Release
We update the eServer software.
You can download the latest version on our web site, or from here
You can download the latest version on our web site, or from here
And If you are interested to know what’s new on this version, check the next file
Technical Announcement HM11061700
Technical Announcement HM11061700
Motion Control: HMI – PLC – B series Servo (1 axis movements)
There are several ways to control one axis.
But If you need to control position (no speed or torque), the Step & direction way is normally the simplest and cheapest way.
The other advantage is that you don’t have to rack one’s brains thinking if that protocol is going to work or not, Step & direction is universal.
But If you need to control position (no speed or torque), the Step & direction way is normally the simplest and cheapest way.
The other advantage is that you don’t have to rack one’s brains thinking if that protocol is going to work or not, Step & direction is universal.
So our intention in this post, is show you the Delta PLC tools to control one axis trough step and direction:
Hardware:
As always the first is how to connect everything.
To communicate PLC and HMI you can check the HMI – 3 PLC Communication Example.
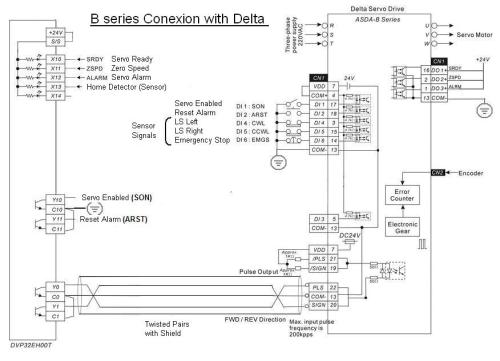
And to know how to connect the B series servodrive with out CPU, just follow the next Schem. (click on the picture to see it bigger)
As always the first is how to connect everything.
To communicate PLC and HMI you can check the HMI – 3 PLC Communication Example.
And to know how to connect the B series servodrive with out CPU, just follow the next Schem. (click on the picture to see it bigger)
Configuration:
Basically the configuration of the servo consist in match the servo inputs of the diagram with the internal configuration, but for better comprehension please check this video
Or simply download the configuration file Step & Direction
Basically the configuration of the servo consist in match the servo inputs of the diagram with the internal configuration, but for better comprehension please check this video
Or simply download the configuration file Step & Direction
Software:
Once the hardware and configuration are finished, then you only need to download the following examples of HMI and PLC programs.
In this examples we use three kind of movements:
Once the hardware and configuration are finished, then you only need to download the following examples of HMI and PLC programs.
In this examples we use three kind of movements:
Relative Movement (DDRVI): We can move our servo some distance without saving any reference. (very useful for moving trays)
Absolute Movement (DDRVA): We can move our servo some distance always having reference where the home is (very useful for linear positioning applications)
Speed Movement (SPD): To mantain the servo in a constant speed. (useful on material handling applications)
Absolute Movement (DDRVA): We can move our servo some distance always having reference where the home is (very useful for linear positioning applications)
Speed Movement (SPD): To mantain the servo in a constant speed. (useful on material handling applications)
All the Delta servo drives (and some inverters) have the possibility to manage them trough Step & Direction
Updated: Extended features for DDRVI and DDRVA instructions on the latest firmware versions.
Check the next link
Check the next link
Posted in Motion
HMI examples: Summer – Winter Hour Change
Who remebers the 2000 efect?
Well with HMI’s every Summer-Winter change is like that.
The real reason is in asia they don’t need to change the winter or summer time, because of that this is a not very common feature on asiatic HMI’s.
Well with HMI’s every Summer-Winter change is like that.
The real reason is in asia they don’t need to change the winter or summer time, because of that this is a not very common feature on asiatic HMI’s.
To solve this situation Mr. Bartek Kiełczewski from Induprogress send us some macro solution made for a Polish company ENCEFAL to achieve to change in a automatic way the Summer-Winter time.
Thanks Bartek
Analog Control II (distributed Analog I/O)
The people who use to work with Delta analog I-O modules, use to have the same doubt.
Why the engineers put a RS485 port on analog I-O’s if you use internal bus to communicate with them?
Why the engineers put a RS485 port on analog I-O’s if you use internal bus to communicate with them?
The reason is very simple, our analog I-O’s can work trough the internal bus, but can work too trough RS485 communication too.
So, with that feature, is possible to create a remote analog I/O’s without any other device.
Just as a reminder, if you need to add digital I/O’s to your, then you should have to add the RTU-RS485 module to your distributed network.
So, with that feature, is possible to create a remote analog I/O’s without any other device.
Just as a reminder, if you need to add digital I/O’s to your, then you should have to add the RTU-RS485 module to your distributed network.
The process to configurate the network is not difficult, but you have to go step by step.
1. The first step to configurate the RS485 protocol into the analog module, is runing the following example, who is ready to communicate with the PLC at ASCII 9600 7,E,1.
DVP04TC RS485 config communication.dvp
If you are interested to know how I did it, go to the Analog Control post
1. The first step to configurate the RS485 protocol into the analog module, is runing the following example, who is ready to communicate with the PLC at ASCII 9600 7,E,1.
DVP04TC RS485 config communication.dvp
If you are interested to know how I did it, go to the Analog Control post
2. Once the protocol is configured, you can double check with the Extension Module Wizard and some IFD6500 (USB to RS485 converter) connected to our computer.
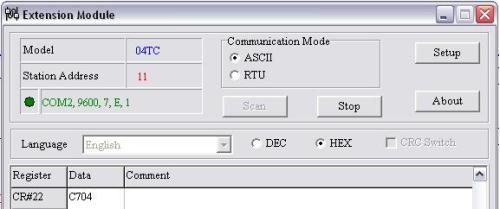

3. Finally, to work with them trough RS485, you just have to communicate with the analog module as an Inverter or temperature controller, or any other RS485 based device.
Remember:
To Write
MODWR “Station Address” “CR number” “Number of data to be write”
To Read
MODRD “Station Address” “CR number” “Number of data to be read”
And SET/RST teh M1122 to trigger the command
Remember:
To Write
MODWR “Station Address” “CR number” “Number of data to be write”
To Read
MODRD “Station Address” “CR number” “Number of data to be read”
And SET/RST teh M1122 to trigger the command
Check the following example for better comprehension
DVP04TC RS485 Read-Write.dvp
DVP04TC RS485 Read-Write.dvp
name: den-eindhoven
Password: BuPd2175
Password: BuPd2175
Posted in PLC Tips&Tricks
Application – Periodic speed change in C2000 (PLC embedded feature)
As many of you should know, C2000 is our new multi-purpose inverter. One of the most useful new features, in my opinion is the 10K steps internal PLC.
Since C2000 “the apple of my eye” was VFD-E, with his internal PLC you can do really amazing stories without the need of purchasing an external PLC.
But some people complains about the limited size of the internal PLC (only 500 steps).
Now, with C2000 this limitation is over. The memory size of C2000 is bigger than DVP14SS2 !! (10K steps vs 8K steps).
And to loop the loop the C2000 have a graphic display to accomplish the “all in one”.
But some people complains about the limited size of the internal PLC (only 500 steps).
Now, with C2000 this limitation is over. The memory size of C2000 is bigger than DVP14SS2 !! (10K steps vs 8K steps).
And to loop the loop the C2000 have a graphic display to accomplish the “all in one”.
C2000 = Inverter + PLC + Graphic Display …………… All in one!
Because all of this, I would like to share with you this simple but didactic example from Mr. Eden Chen of how to use the internal PLC of C2000.
If do you have interesting C2000 PLC applications don’t hesitate to share with us trough the commentaries.
If do you have interesting C2000 PLC applications don’t hesitate to share with us trough the commentaries.
name: den-eindhoven
Password: BuPd2175
Password: BuPd2175
Posted in Successful Applications
Communication interface PC to DVP (Delta PLC)
We have several methods to communicate our PC with the Delta PLC’s, and many users don’t know some of them.
On the other side, every time is more difficult to found RS232 serial ports in the computers, and the USB to RS232 converters are not as much trustable as they must, because of that I would like to list our alternatives to that problem:
On the other side, every time is more difficult to found RS232 serial ports in the computers, and the USB to RS232 converters are not as much trustable as they must, because of that I would like to list our alternatives to that problem:
Direct communication PC to PLC:
2. PC USB port to PLC RS485 port using the device IFD6500 (Delta USB-RS485 converter).
3. PC Ethernet port to PLC DVPEN01-SL module (need compatibility with high speed bus)
Communication PC to PLC trough Delta HMI (Direct Link):
The direct link capability in Delta HMI is used to communicate with the PLC and HMI with one only wire. Furthermore this capability have been improved lately and now is possible monitor both of them at the same time using only one wire. (direct Link function updated)
1. Direct Link function trough Standard USB wire (WPLSoft and ISPSoft)
2. Direct Link function trough Ethernet (WPLSoft and ISPSoft)
Exactly the same feature is available with the new DOP-B HMI’s with Ethernet embedded, really helpful for remote support.
Exactly the same feature is available with the new DOP-B HMI’s with Ethernet embedded, really helpful for remote support.
3. Direct Link function trough USB host (WPLSoft only).
All systems are Win XP / Win 7 compatibles, so now there’s no reason to do not communicate with Delta PLC.
Delta HMI – USB Updating firmware
A few month ago our R&D people develop a new useful feature for DOP-B HMI.
Is the possibility to update the firmware of the HMI without any PC (only USB disk!).
Is the possibility to update the firmware of the HMI without any PC (only USB disk!).
The procedure is quite simple, take a look to the next video.
This feature is only available for DOP-B and firmware versions up to v2.00.20
Application – Recipe download using eServer
Before Learn how to extract production information trough eServer with the post eServer Tool.
This time we’re going to focus in a real application case.
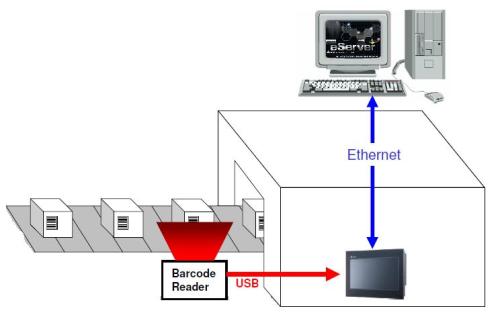
Mr. Eden Chen (very good technician and better person) shows us how to store Barcode data on our office PC trough eServer Software.
The system configuration starts with a USB barcode, connected directly to the HMI.
And then uses the Ethernet port of the HMI and eServer tool to store the code of every element that the barcode reads.
This time we’re going to focus in a real application case.

Mr. Eden Chen (very good technician and better person) shows us how to store Barcode data on our office PC trough eServer Software.
The system configuration starts with a USB barcode, connected directly to the HMI.
And then uses the Ethernet port of the HMI and eServer tool to store the code of every element that the barcode reads.
PLC – VFD Comunication
Another communication post.
This time I’ll give you the tools to control some Delta Inverter with Delta PLC trough RS-485.
I’ll made this tutorial step by step, starting as always from the hardware.
I’ll made this tutorial step by step, starting as always from the hardware.
1. Hardware
The pinout in this case is really simple, the middle pins of the RJ11 (or RJ45) are the positive and negative of the RS485 communication. So I recommend to buy some RJ01 from Delta inverter range, or some telephone wiring, cut one side and use the flying leads to connect to the PLC.
The pinout in this case is really simple, the middle pins of the RJ11 (or RJ45) are the positive and negative of the RS485 communication. So I recommend to buy some RJ01 from Delta inverter range, or some telephone wiring, cut one side and use the flying leads to connect to the PLC.
2. Decide the protocol to be used.
And remember to write the protocol in a paper avoids future problems!
In this case I’m going to use the next (7, N, 2, 38400, ASCII)
And remember to write the protocol in a paper avoids future problems!
In this case I’m going to use the next (7, N, 2, 38400, ASCII)
3. Configuration of the Inverter.
The important think on this step is get ready the inverter to receive orders from RS485 interface, so depending the inverter the values are going to be different. In this example I use VFD-E.
Check the parameters If you are going to use another inverter.
The important think on this step is get ready the inverter to receive orders from RS485 interface, so depending the inverter the values are going to be different. In this example I use VFD-E.
Check the parameters If you are going to use another inverter.
2.00 = 3
Source of First Master Frequency Command
3: RS-485 (RJ-45) communication
Source of First Master Frequency Command
3: RS-485 (RJ-45) communication
2.01 = 3
Source of First Operation Command
3: RS-485 (RJ-45) communication. Keypad STOP/RESET enabled.
Source of First Operation Command
3: RS-485 (RJ-45) communication. Keypad STOP/RESET enabled.
9.00 = 2
Communication Address
in my example 2
Communication Address
in my example 2
9.01 = 3
Transmission Speed
3: Baud rate 38400bps (max speed for some inverters)
Transmission Speed
3: Baud rate 38400bps (max speed for some inverters)
9.04 = 0
Communication Protocol
0: 7,N,2 (Modbus, ASCII)
Communication Protocol
0: 7,N,2 (Modbus, ASCII)
4. PLC Software (send).
To send some frame trough the PLC RS485 port, we’re going to use the instruction MODWR (API 101) and the special mark M1122 to trigger the communication.
To send some frame trough the PLC RS485 port, we’re going to use the instruction MODWR (API 101) and the special mark M1122 to trigger the communication.
The MODWR has the next composition:
MODWR S1 S2 N
S1 = Device Address of the slave (2 as we configure on steps 3, 4 and 5)
S2 = Data Address of the slave (H2001 to change frequency)
N = Data to be written (just 1 word)
MODWR S1 S2 N
S1 = Device Address of the slave (2 as we configure on steps 3, 4 and 5)
S2 = Data Address of the slave (H2001 to change frequency)
N = Data to be written (just 1 word)
You can found the inverter slave data address on the inverter manual or in following file
Inverter Data Address for VFD-E.
Inverter Data Address for VFD-E.
5. PLC Software (read).
To read some frame trough PLC RS485 port, for example the Frequency Output. We’re going to use the instruction MODRD (API 100) and again the special mark M1122 to trigger the communication.
But this time, we will use the special registers D1050 to D1055, where we could found the data received.
To read some frame trough PLC RS485 port, for example the Frequency Output. We’re going to use the instruction MODRD (API 100) and again the special mark M1122 to trigger the communication.
But this time, we will use the special registers D1050 to D1055, where we could found the data received.
The MODRD has the next composition:
MODWR S1 S2 N
S1 = Device Address of the slave (2 as we configure on steps 3, 4 and 5)
S2 = Data Address of the slave (H2102 to read output frequency)
N = Data to be read (3 words)
MODWR S1 S2 N
S1 = Device Address of the slave (2 as we configure on steps 3, 4 and 5)
S2 = Data Address of the slave (H2102 to read output frequency)
N = Data to be read (3 words)
You can download the PLC program examples on the next link.
Read-Write to Inverter.rar
Read-Write to Inverter.rar
RTU-EN01 application
Inside the Delta Fieldbus Solutions range, we provide several different field-bus (Modbus, Ethernet, CanOpen, Profibus, DeviceNet, etc…) and almost for all of them we have Remote Terminal Units (RTU) to help us to solve us a lot of long distance troubles.
In this case the application is with the Ethernet Modbus TCP/IP Field-bus (RTU-EN01).
This device is designed to setup remote I/O trough Ethernet Modbus TCP/IP, but it has also another capability.
This device could be the node to have a whole modbus network below him. like the picture attached.
This device is designed to setup remote I/O trough Ethernet Modbus TCP/IP, but it has also another capability.
This device could be the node to have a whole modbus network below him. like the picture attached.
So below I’ll try to show you how to access to those slave PLC’s from the SV28 Master like a remote I/O modules. Of course you can connect in spite of PLC’s some inverter, servomotor or temperature controller.
The example consists in receive in the 28SV Master the DI/DO status of the 14SS slaves with ID:4 and 5.
1. We need to map the Master memory with the remote DI/DO of the slaves (for example):
ID:5 : Y0~Y7 map to D200 ( CoiltoD.dvp )
ID:4 : Y0~Y7 map to D300 ( CoiltoD_2.dvp )
ID:5 : Y0~Y7 map to D200 ( CoiltoD.dvp )
ID:4 : Y0~Y7 map to D300 ( CoiltoD_2.dvp )
2. Open the DCI Soft, and detect the DVPEN01-SL. Go to Data Exchange and set as the picture below
3. The detect the RTU-EN01 and configure the IP address as you configured in the Data Exchange thumb index
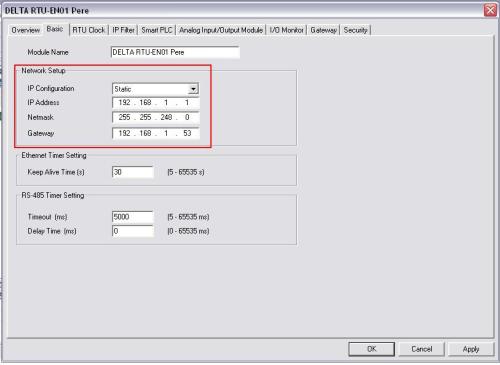

4. Finally download the examples attached and in theory you have to see the next
Master D100 map to Y0~Y7
Master D200 map to Y10~Y17
( refer to DtoCoil_2.dvp)
Master D100 map to Y0~Y7
Master D200 map to Y10~Y17
( refer to DtoCoil_2.dvp)
5. By the way, don’t forget to configure the comunication port of the RTU-EN01 with the same protocol as the 14SS Slaves!
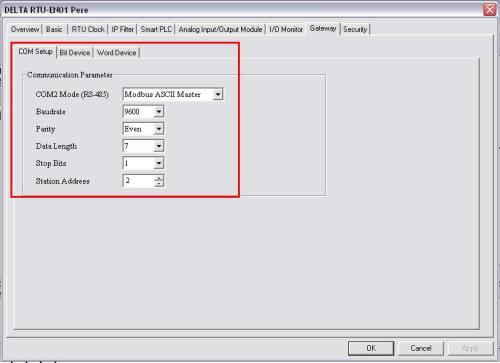

Now you only have the problem to decide how big is your network!
Hannover Messe A2 motion demos 2
To finish the presentation of the motion Demos of the Hannover Messe, I give you the 2 other demos left.
First the Demo of a 4 axis of A2 servos controlled by DVP20PM, and our new vision system who recognize the value and the position of the dice.
We call it the automatic Gambler
And Finally the Demo of the new DMCNET system.
One Embeded PC with our DMCNET card, who is able to control with sincronization 12 axis!
Furthernore 3 of those 16 axes are linear motors, and they work with Delta A2 drives (in the future we explain our secret).
And of course all communicating trough CANOpen DS402, even those Remote I/O’s.
One Embeded PC with our DMCNET card, who is able to control with sincronization 12 axis!
Furthernore 3 of those 16 axes are linear motors, and they work with Delta A2 drives (in the future we explain our secret).
And of course all communicating trough CANOpen DS402, even those Remote I/O’s.
Hannover Messe A2 motion demos 1
As many of you, the last week we have been attending the Hannover Messe. Presenting all the new products that we already presented on this blog. (and many more…)
One of the most interesting things of the Delta IABU stand were the Motion Demos comming from Taiwan.
There were 3, and for the people who can’t visit us these days we will show you a video of all of them.
Today we’ll start with a Demo who shows us how A2 solve the problem of the Cut on the fly applications.
There were 3, and for the people who can’t visit us these days we will show you a video of all of them.
Today we’ll start with a Demo who shows us how A2 solve the problem of the Cut on the fly applications.
The demo is presented by a good friend of us, Mr. Winex Yang, our Taiwanese expert in Delta Electronics Motion systems.
New Product Launch DOP-B07E(S)515
Finally Delta enters completely to the Ethernet, with the new DOP-B 7inch.
This HMI it has been desinged to offer one step more to the customers who are looking to a 5inch HMI range.
With his 5inch pannel cut-out this 7inch HMI can adopts 65536 colors TFT LCD, with greatly enhances resolution to SVGA(800×600).
With his 5inch pannel cut-out this 7inch HMI can adopts 65536 colors TFT LCD, with greatly enhances resolution to SVGA(800×600).
Delta also provide Standard type (DOP-B07S515) and Ethernet type (DOP-B07E515) for different application field.
Dowloand the next file for detailed information
DOP-B07E(S)515
DOP-B07E(S)515
Our first shipment will arrive on June 2011, so you already ask for quotation to your closest distributor.
Posted in PLC Tips&Tricks
Direct Link Function Updated
Direct Link function is a feature who allows to the programmer to upload/download the PLC program connecting the PC directly to the HMI.
So the HMI bypass the PC directly to the PLC.
So the HMI bypass the PC directly to the PLC.
This function is so useful when the PLC is so hidden inside the cabinet, you forget your RS232 programming wire (DVPACAB2A30) or you just want to avoid those annoying and sometimes unreliable USB-RS232 converters.
The major problem in the past was the impossibility to debug the PLC and HMI at the same time while the bypass is running.
According to that our HMI department send us some video showing this new updating for the Direct Link function.
According to that our HMI department send us some video showing this new updating for the Direct Link function.
This Feature is available too with ISPSoft
Labelling Machine Application
Today a new typical application for Delta PLC.
We’ll use the PLC capabilities and some sensor, to synchronize the AC motor feeder of the system with some stepper motor who will stick the label onto the product.
We’ll use the PLC capabilities and some sensor, to synchronize the AC motor feeder of the system with some stepper motor who will stick the label onto the product.
This program is one of the typical applications to use one of the new PLC instructions called MASK
To take a look to the program sequence, don’t hesitate to download the following pdf
Labbelling Machine Application
Labbelling Machine Application
New S2 application Manual
Let me agree the great welcome that is having the new S2 PLC series in whole EMEA region.
Because of that I’m so glad to announce the official application manual for S2 series.
Because of that I’m so glad to announce the official application manual for S2 series.
There, we will find important elements than the SS2, SA2 or SX2 internal mapping, or the name of the High speed counters.
If you are using or planing to use S2 or E2 series, don’t hesitate to download it, you’re going to use it!
S2 and E2 application Manual
S2 and E2 application Manual
Posted in PLC Tips&Tricks
eServer Tool
The eServer is a new tool for Delta Ethernet HMI’s to extract data from your system remotely.
With this tool you can store all the production information of your machine directly on your computer.
With this tool you can store all the production information of your machine directly on your computer.
This software as the rest of Delta softwares is free, and you can download the last version on the next link
eServer V1.00.07
eServer V1.00.07
And for better support, first take a look to the next video, hanged for our R&D managers.
They advice to put resolution 720pp and full screen for better quality
They advice to put resolution 720pp and full screen for better quality
Delta Solar tracking system
One of the most interesting application this days for automation companies, is the solar tracking.
Many different manufacturers have been trying to improve and create new products only for this kind of applications.
Many different manufacturers have been trying to improve and create new products only for this kind of applications.
Delta global automation, provides to the customer for a complete solution.
As a global automation solution provider, we already have all the elements. In the presentation attached, you will see our solution for the different kinds of solar applications.
As a global automation solution provider, we already have all the elements. In the presentation attached, you will see our solution for the different kinds of solar applications.
Those solutions, are already tested and working all around the world.
Posted in Successful Applications
DOPSoft Beta version Release
Last week appears a new BETA software to program Delta DOP-B HMI’s.
It’s call DOPSoft
It’s call DOPSoft
This software contains several very interesting new features, I try to resume them below:
- Multi-Language System Menu/Message
- Import/Export Multi-language text (in CSV/Excel format)
- Import/Export Multi-language text (in CSV/Excel format)
- User-Define Sub-Marco Name
- Improve Marco Edit interface
- Universal printing driver with PCBridge.
- Improve Marco Edit interface
- Universal printing driver with PCBridge.
- Rotating HMI display (90, 180 and 270 degrees).
- Rotating program elements (90, 180 and 270 degrees).
- Rotating program elements (90, 180 and 270 degrees).
- Improve Historical Trend Graph element
- Advance element part list
- New Edit objects like the slider, List box and Combo box.
- Advance element part list
- New Edit objects like the slider, List box and Combo box.
- Reset HMI option
- Flexible control/status block setting
- Flexible control/status block setting
- Picture from other programs can be pasted to the element directly
- Improve compile speed
- User-defined address for MAX/MIN limit of elements
- Improve compile speed
- User-defined address for MAX/MIN limit of elements
If do you like to be Delta’s Beta tester, please download this software from our web site
DOPSoft 1.00.00
And leave your commentaries below, We’re eager to know for your personal experience!
We’ll keep you informed for the final version release.
DOPSoft 1.00.00
And leave your commentaries below, We’re eager to know for your personal experience!
We’ll keep you informed for the final version release.
HMI – DTC
Trying to complete our communication library, today we will show you how to communicate some HMI with our Temperature controllers.
Delta Automation have several models of Temperature controllers, in this case we need the ones with communication feature (almost all of them).
Please refer to the next link for further information.
DTC Delta temperature Controllers
Please refer to the next link for further information.
DTC Delta temperature Controllers
Like all the communication examples, we start fixing the protocol we are going to use. In this case:
RS485 Modbus ASCII
38400 bps
7 Data Bits
Parity Even
1 Stop Bits
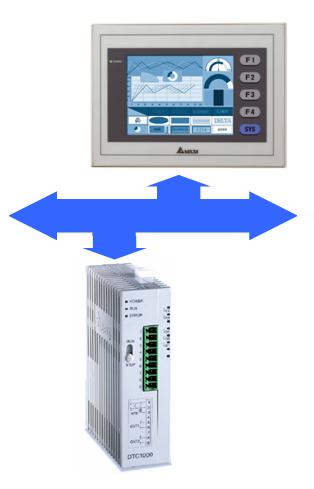
So once we have decided the protocol, we have to implement it on both devices.
To implement to the HMI please refer to the HMI- 3 PLC communication example post.
RS485 Modbus ASCII
38400 bps
7 Data Bits
Parity Even
1 Stop Bits

So once we have decided the protocol, we have to implement it on both devices.
To implement to the HMI please refer to the HMI- 3 PLC communication example post.
To implement to the DTC please download the next video, where is explained step by step how to configurate some DTC trough Computer.
HMI – DTC control
HMI – DTC control
In case that you already have some DTB or DTA, you can do it following the instruction manual.
DTA Instruction Manual
DTB Instruction Manual
DTA Instruction Manual
DTB Instruction Manual
And finally here attached some DOP-B program example for control by communication some DTC (Delta Temperature Controller).
HMI – DTC control Example
HMI – DTC control Example
Remember:
name: den-eindhoven
Password: BuPd2175
name: den-eindhoven
Password: BuPd2175
And if you need to add some internal register of the DTC, and you can found it on the example, just take a look to the DTC manual, and you will found the Modbus table.
DTC Instruction Manual
DTC Instruction Manual
Delta HMI and Windows 7 drivers
Nothing remains!
And finally Windows XP have a proper substitute, Windows 7.
And finally Windows XP have a proper substitute, Windows 7.
Unfortunately, the people from Microsoft doesn’t think in HMI programmers, because the internal drivers has been changed…
Because of that we have found a solution to support those new drivers on our HMI’s.
Because of that we have found a solution to support those new drivers on our HMI’s.
So if you have a new Windows 7 or Windows Vista and your drivers doesn’t works, don’t worry, and just follow the next steps:
1 – Check the firmware of your HMI.
The first firmware version with the new Windows 7 drivers is V2.0170. If your HMI have a lower firmware version, please Update the HMI trough XP computer or serial port.
The first firmware version with the new Windows 7 drivers is V2.0170. If your HMI have a lower firmware version, please Update the HMI trough XP computer or serial port.
2 – Once you have the proper firmware, go to the system menu, and choosesystem setting.
3 – Then look for the MISC menu, and there you should found the option called “USBCommMode.“
4 – You only need to change that USBCommMode option from 0 to 1.
USBCommMode = 0 (Windows XP)
USBCommMode = 1 (Windows Vista & Windows 7)
USBCommMode = 0 (Windows XP)
USBCommMode = 1 (Windows Vista & Windows 7)
If do you want further information of how to update the firmware trough serial port, please download the DOP-B and W7 trouble pdf from our ftp.
Remember!
name: den-eindhoven
Password: BuPd2175
name: den-eindhoven
Password: BuPd2175
Problem Solved
Posted in HMI Tips&Tricks
DEN Newsletter february 2011
If you are interested in further information download the pdf file from the next link
DEN Newsletters
DEN Newsletters
We will exhibit this year at the Hannover Messe from 4-8 April, Hall 11, A49.
Just like last year we will organise a seminar to inform you about our newest products. This will take place on Wednesday 6th April from 12.30 to 17.00. We will send out a separate invitation with all the details.
Just like last year we will organise a seminar to inform you about our newest products. This will take place on Wednesday 6th April from 12.30 to 17.00. We will send out a separate invitation with all the details.
We look forward to see you in Hannover.
Posted in PLC Tips&Tricks
Delta Customer FTP
Dear Readers,
I have been receiving a few complains regarding the FTP links doesn’t works.
I’d try to arrange them, but it seems that still need user and Password.
I’m sorry about that!
I’d try to arrange them, but it seems that still need user and Password.
I’m sorry about that!
To solve this issue, I’ll upload all the information of this blog on the next FTP address
All the Blog files are on the next path
\Industrial Automation Products\_Delta Application Guide\Blog Examples
\Industrial Automation Products\_Delta Application Guide\Blog Examples
On the other hand, on that FTP site you will found all the new Software, Brochures, Manuals, Certificates, Pictures, etc.. of our products.
Posted in PLC Tips&Tricks
HMI – 3 PLC Communication Example
Another communication example for our blog library.
The easy one, should be do it only one HMI and one PLC. But to do it more interesting we are going to set up a Modbus ASCII network of one HMI(master) with 3 PLC’s(slaves).
The easy one, should be do it only one HMI and one PLC. But to do it more interesting we are going to set up a Modbus ASCII network of one HMI(master) with 3 PLC’s(slaves).
To setup any system I always divide the problem in two basic parts, Hardware and Software.
Hardware (physical level):
Take a look to the pinout of all the devices to connect, in our case the PLC is easy, and for the HMI, take a look to the next image extracted from the instruction manual.
Take a look to the pinout of all the devices to connect, in our case the PLC is easy, and for the HMI, take a look to the next image extracted from the instruction manual.
Software (Protocol):
An old trick that I learn after a couple of communication challenges is write in a post it the communication protocol that you are going to use. Basically, because you will need it so many times, and is very easy to make mistakes!!
An old trick that I learn after a couple of communication challenges is write in a post it the communication protocol that you are going to use. Basically, because you will need it so many times, and is very easy to make mistakes!!
Protocol used:
7,N,2 (Modbus, ASCII), 9600 bps
7,N,2 (Modbus, ASCII), 9600 bps
Network configuration:
HMI Address: 0 (master)
PLC1 Address: 1 (Slave)
PLC2 Address: 2 (Slave)
PLC3 Address: 3 (Slave)
HMI Address: 0 (master)
PLC1 Address: 1 (Slave)
PLC2 Address: 2 (Slave)
PLC3 Address: 3 (Slave)
Software (Computer level):
And finally, to show you how to configure the communication with the ScreenEditor and WPLSoft, I’ll ask you to download the next file, where you can file the programming examples, and some video file with the exe extension, to follow all the process.
And finally, to show you how to configure the communication with the ScreenEditor and WPLSoft, I’ll ask you to download the next file, where you can file the programming examples, and some video file with the exe extension, to follow all the process.
Enjoy!
New PLC Instructions Announcement
As a programmer, sometimes I really miss some instructions in the Delta PLC’s. Recently, I discover that the others Delta programmers miss exactly the same instructions!
Because of that, I’m glad to announce a new group of instructions/functions for the new batch of Delta PLC’s.
Because of that, I’m glad to announce a new group of instructions/functions for the new batch of Delta PLC’s.
Here related the most interesting news in my opinion
Bit control:
Finally the eagerly awaited Specific Bit control instructions!!
Bit control:
Finally the eagerly awaited Specific Bit control instructions!!
Motion:
Mask Area Functions: Essential for Labeling applications
DZRN: Improving the Homming functions!
DVSPO: Variable Speed Pulse Output (Useful for control the speed of our motor using some analog input).
DICF: Immediately change frequency (another motion instruction thinking in typical motion applications like fly-on-the-cut).
Comunications:
Improving the comunication performance with the new function codes and special registers on the MODRW and PLCLink instructions.
Improving the comunication performance with the new function codes and special registers on the MODRW and PLCLink instructions.
Transform and Move Data:
New DTM instruction with several different features. I attach a temporary translation for your information, the formal translation will be released in the revision V of the manual
DTM Instruction sheet
New DTM instruction with several different features. I attach a temporary translation for your information, the formal translation will be released in the revision V of the manual
DTM Instruction sheet
Before you ask us how can I use that new instructions, please take a look to your PLC firmware version, and check it with the table at the end of the document.
And finally the promise of a very soon release of the new ISPSoftv1.08
Posted in Announcements
Trend Graph vs. Historical Trend Graph
Some people use to doubts what Graph utility is better for his application, in this case I would like to explain the differences between Trend Graph and Historical Trend Graph.
The historical Trend graph is the typical tool to see graphically the evolution in time of some variable, for example, temperature or pressure.
The Trend graph is the tool to show graphically several values in the same graph without the time basis. This graph could be useful, for example, to show the evolution of the different temperatures in a different oven’s chain.
To make easy the implementation of these tools, please check the next examples:
To download the files click the left button and select “save target as…”
Posted in HMI Tips&Tricks
Store control with Delta products
The application shares in the presentation below, have the next case details, you can download the full explanation in the link below.
The chain stores use Delta PLCs and IO modules, together with AC motor drives to control the lighting and air-conditioning (incl. the control of temperature, humidity, pressure and quality of air) systems
The headquarter monitors the lighting and air-conditioning systems of chain stores by using Delta Ethernet module – DVPEN01-SL, controlling the electricity consumption and further saving energy.
The system intends to position itself as a world reference in terms of eco-efficiency. Consume 30% less energy than the average annual expenditure of a conventional store, a 70% decrease water consumption and prevent the emission of more than 200 tones of CO2 a year.
Posted in Successful Applications
Communication Modules
Delta PLC’s provide several solutions for all popular fieldbus.
With this communication modules we can cover the three levels of communication:
With this communication modules we can cover the three levels of communication:
For Device Control: Modbus RTU/ASCII, PLCLink, etc..
For Data Exchange: DeviceNet, CANOpen, Profibus-DP.
For Data Collection: Ethernet Modbus TCP/IP, Ethernet IP.
For Data Exchange: DeviceNet, CANOpen, Profibus-DP.
For Data Collection: Ethernet Modbus TCP/IP, Ethernet IP.
To help you to choose what is going to be the best choice, we advise you to take a look to the next presentation provided by Mr. Johnny Hsu.
Posted in PLC Tips&Tricks
Remote control using eRemote
Dear all,
Here attached I put a nice example of how to control remotely your home trough eRemote.
This is a good example of building automation with Delta equipment, I hope you enjoy.
Source: Mr. Eden Chen
New product Launch SS2 and SX2
We are glad to announce the formal release of the new Slim 2 series in Middle East, Africa and Europe.
This new Slim 2 series have serious improving in comparison with the Slim series in several different features, because of that we arrange the next table for your information where you could see the principal differences.
This new Slim 2 series have serious improving in comparison with the Slim series in several different features, because of that we arrange the next table for your information where you could see the principal differences.
All the Slim Extension modules are compatible with the new Slim2 models.
For more information we recommend you to download the new PLC brochurehere.
And the technical Manuals of SS2 here or SX2 here.
Furthermore, attahced on this mail you could found a comparission file with all the detailed differences between Slim series and Slim 2 series.
For more information we recommend you to download the new PLC brochurehere.
And the technical Manuals of SS2 here or SX2 here.
Furthermore, attahced on this mail you could found a comparission file with all the detailed differences between Slim series and Slim 2 series.
Please note that the pinout of the new models are not the same of their predecessors.
On the other hand, we are going to release that new products in a scaled way, form today is possible to order the next models:


The SA2 model is not avaliable yet, and will be avalaible soon.
Posted in Announcements
Create a FB with ISPSoft
One of the objectives of this blog is to create a Function Block library to share with you all.
Because of that, in the next video you could learn how to create a simple Function Block (FB) with ISPSoft.
Because of that, in the next video you could learn how to create a simple Function Block (FB) with ISPSoft.
Why use FBs?
Created and tested once, and use it several times.
Safe intermediate variables.
Easy to understand and debug the program.
etc..
Created and tested once, and use it several times.
Safe intermediate variables.
Easy to understand and debug the program.
etc..
Posted in PLC Tips&Tricks
HMI – VFD Communication Example
In a near future we are going to post several communication examples between Delta HMI touch pannels and the different Delta devices.
Today we start on one of the most demanded:
Delta HMI with Delta Inverter.
Today we start on one of the most demanded:
Delta HMI with Delta Inverter.
The example is programmed with Screen Editor 2.00.20
Protocol used:
7,N,2 (Modbus, ASCII), 9600 bps
7,N,2 (Modbus, ASCII), 9600 bps
Network configuration:
HMI Address: 0 (master)
VFD Address: 1 (Slave)
HMI Address: 0 (master)
VFD Address: 1 (Slave)
VFD Configuration:
2.00 = 3 (frequency source RS485 communication)
2.01 = 3 (Operation command source RS485 communication)
9.00 = 1 (Station Address)
9.01 = 1 (9600 bps)
9.04 = 0 (7,N,2, Modbus, ASCII)
2.00 = 3 (frequency source RS485 communication)
2.01 = 3 (Operation command source RS485 communication)
9.00 = 1 (Station Address)
9.01 = 1 (9600 bps)
9.04 = 0 (7,N,2, Modbus, ASCII)
Download HMI-VFD Comunication Example
click left button and select “save target as…”
click left button and select “save target as…”
If you find any problem with it, don’t hesitate to leave a comment
Posted in HMI Tips&Tricks
Analog Control with ISPSoft
Here attached some ISPSoft file with many Function Blocks (FB), very useful to configurate the analog input/output modules from Delta.
This file is made it by Bartek Kiełczewski, from the Delta distributor in Poland (induprogress).
Thank you very much Bartek!
Thank you very much Bartek!
And if anyone have FB’s to share, don’t hesitate to send us.
We are going to publish it as soon as we can.
We are going to publish it as soon as we can.
Posted in PLC Tips&Tricks
Analog Control
One of the most typical requests, is about how to configurate the analog I/O expansion modules.
If you try to do it directly, is a little confusing, but, check the video first, and then tell me how difficult can be…
In the next post some FB to do the same with ISPSoft
Posted in PLC Tips&Tricks
